Introducing the PoS

Overview

The Cloud POS Application is the core tool used by employees, cashiers, and managers to handle transactions, manage orders, and process payments in real time. It’s designed to be touch-friendly, fast, and user-friendly, with full support for multiple languages (Arabic and English), dynamic product loading, and multi-branch operations. This document explains how to use the Cloud POS app efficientl, where employees interact with products, orders, and payments. and guides you through every available function in the system.

Getting Started

This section introduces how to access and log in to the Cloud POS app from supported devices like desktop stations or Android terminals.

Accessing the PoS App

To get started, launch the Cloud POS desktop application or the Android terminal app provided by your restaurant’s system administrator.

employee login to an existing shift

Login into the PoS App

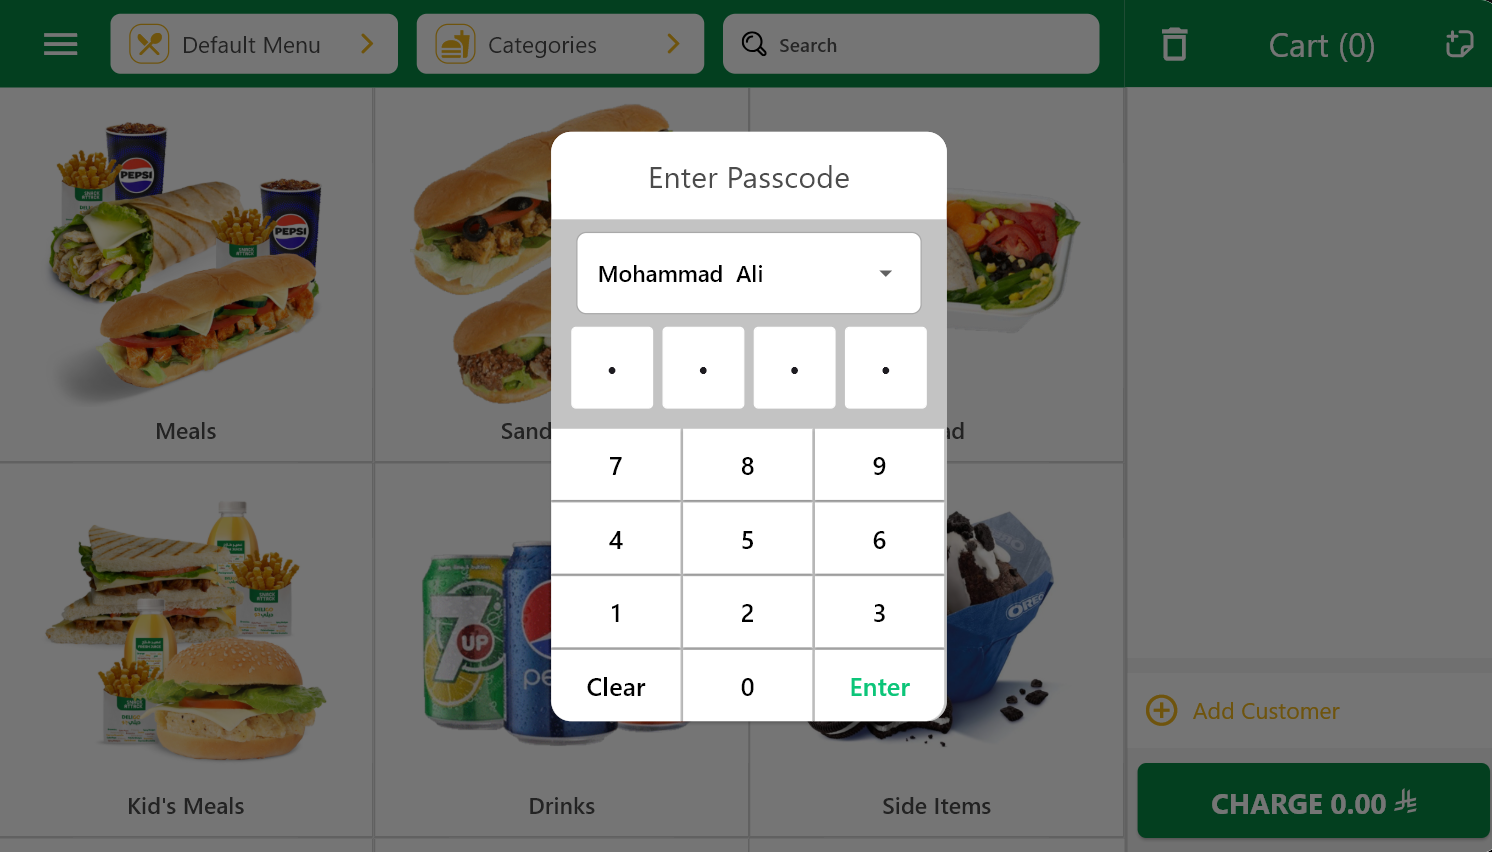
After launching the app:

  • Enter your assigned passcode.
  • Select your employee name from the list.
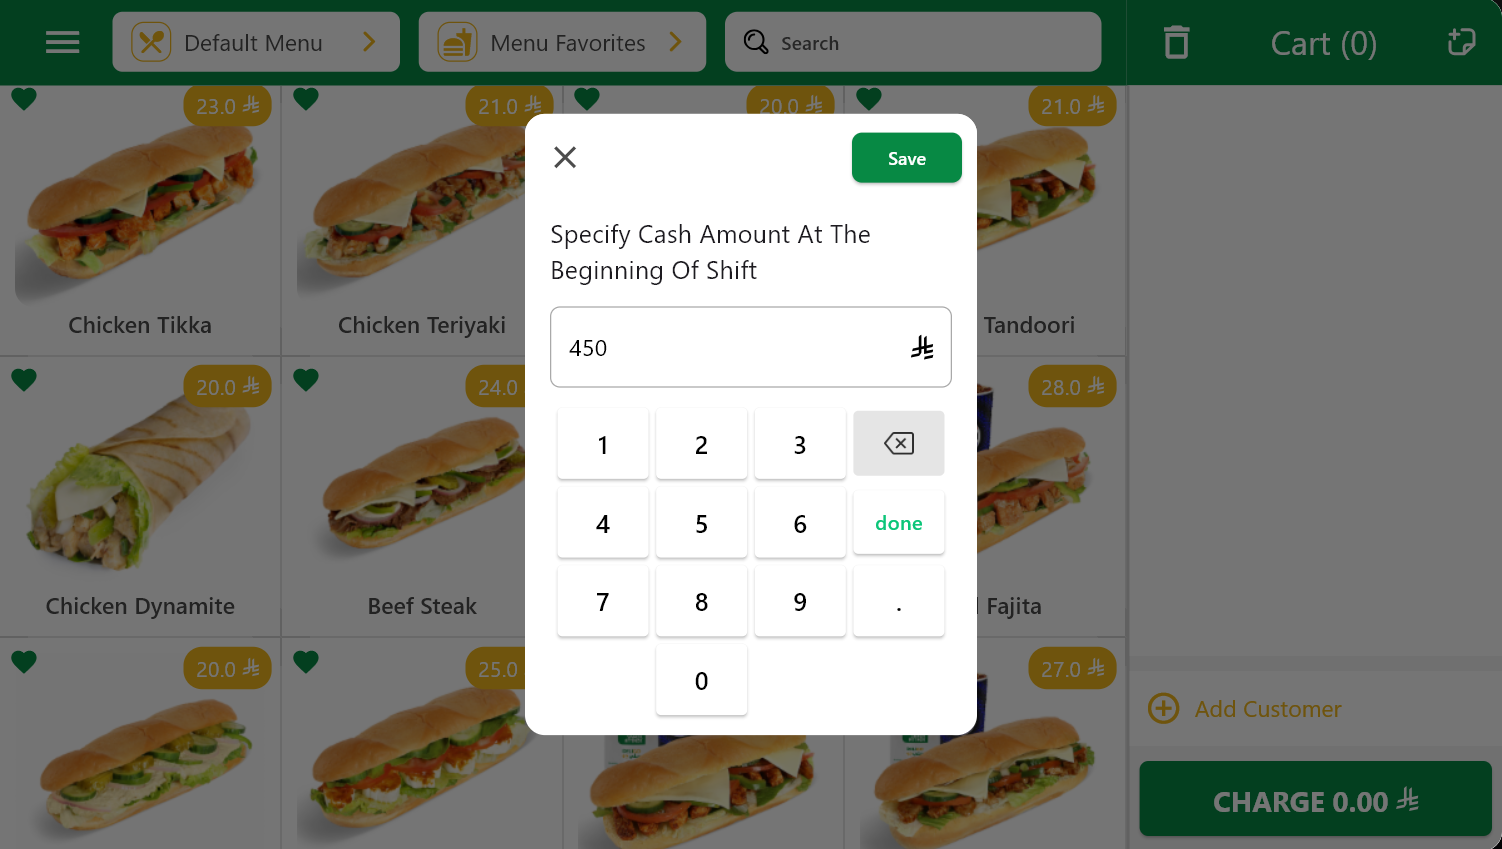
  • Once authenticated, a prompt will appear to start a new shift.
  • After confirming, you will be taken directly to the categories grid screen, which serves as the main order interface.
employee login to an existing shift

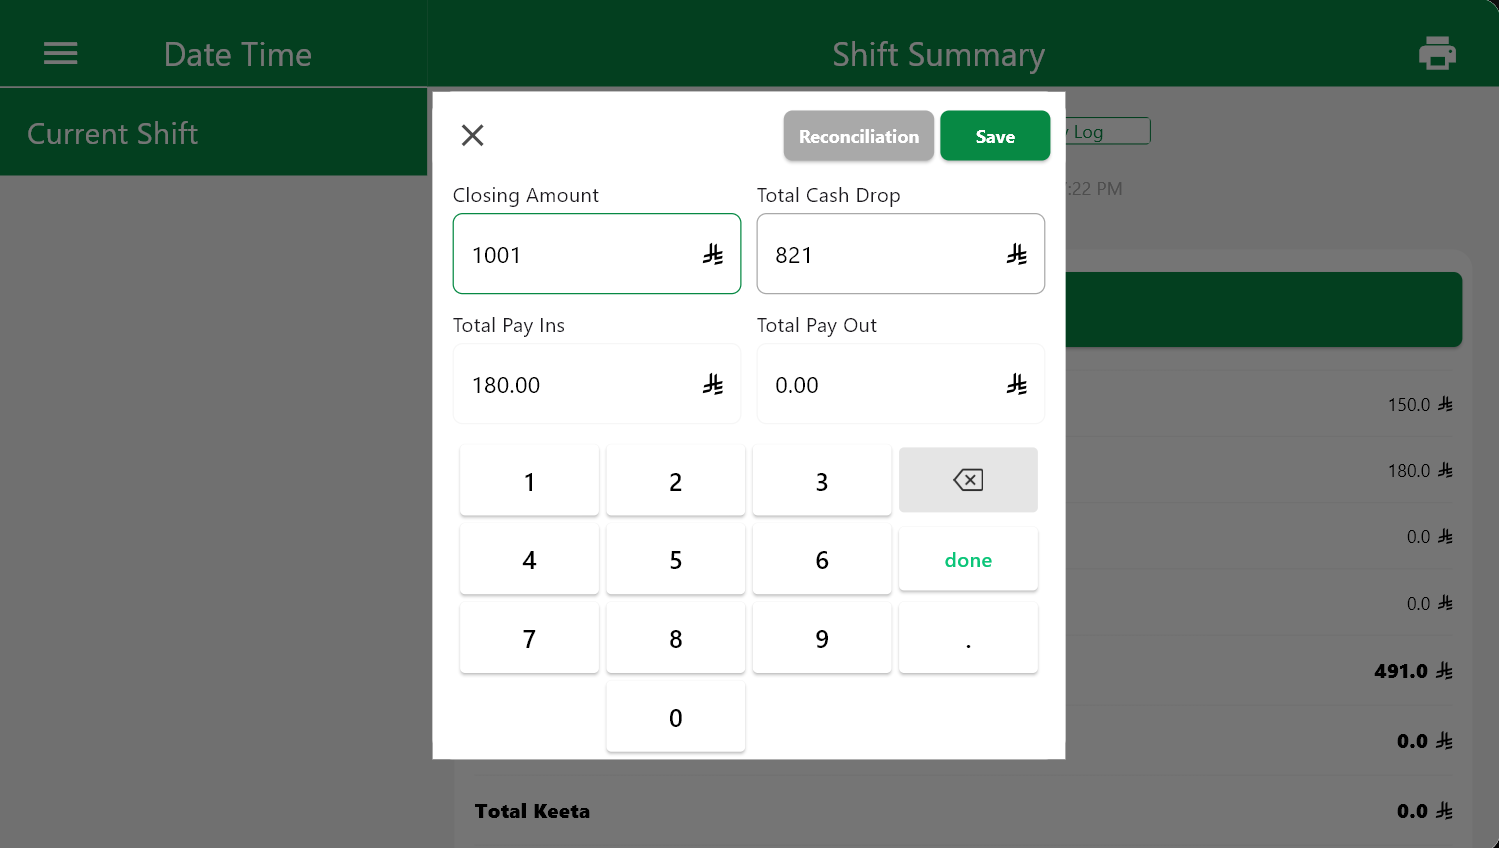
Opening a new shift will be explained in detail in the “Shifts” section.

The PoS App Interface

This section describes the user interface and functionality of the POS terminal, including how to navigate and use key features.

Cashier

This section will cover cashier-specific functions like adding orders, editing items, and using shortcuts for efficient order handling.

POS app interface overview

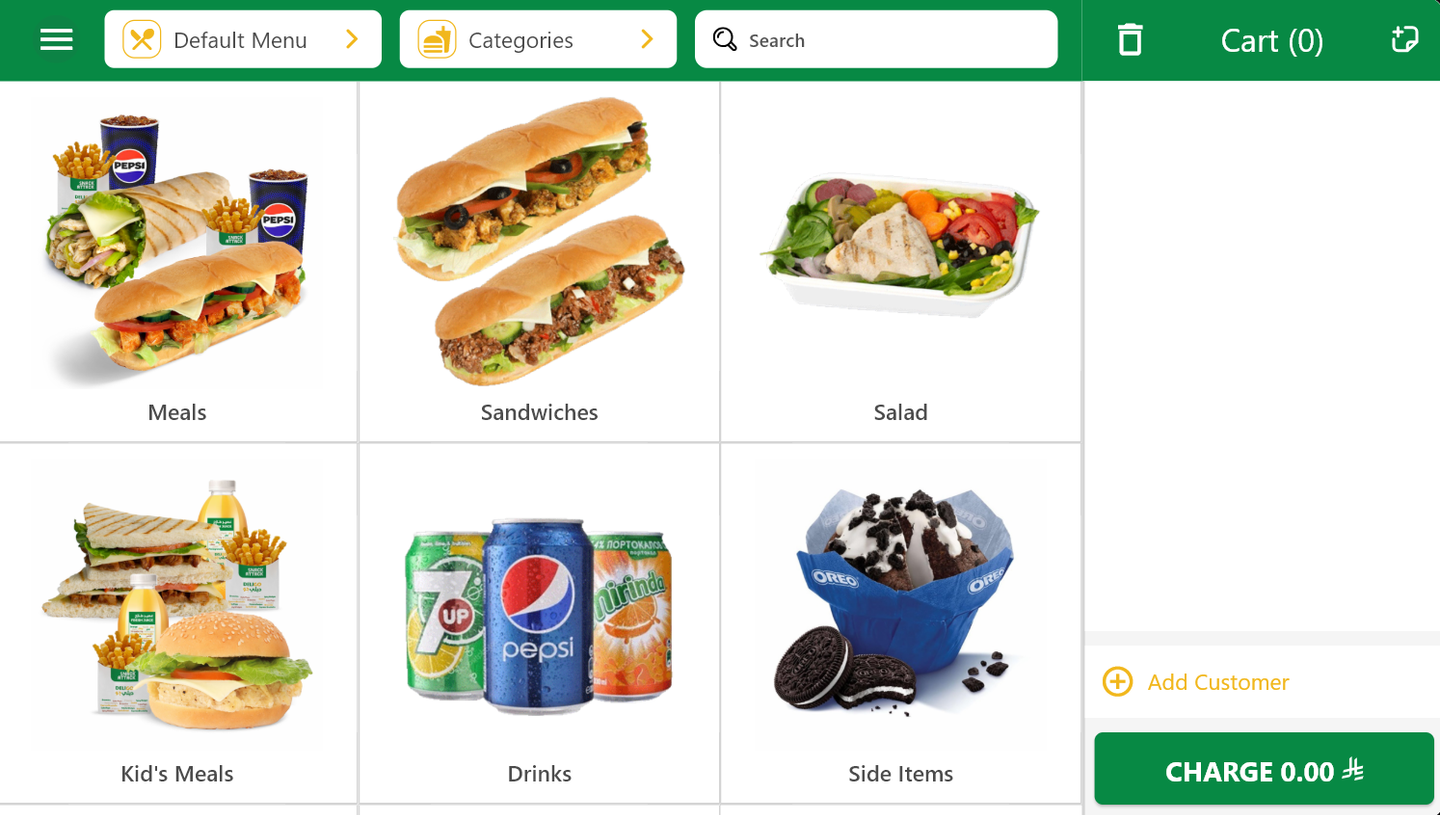
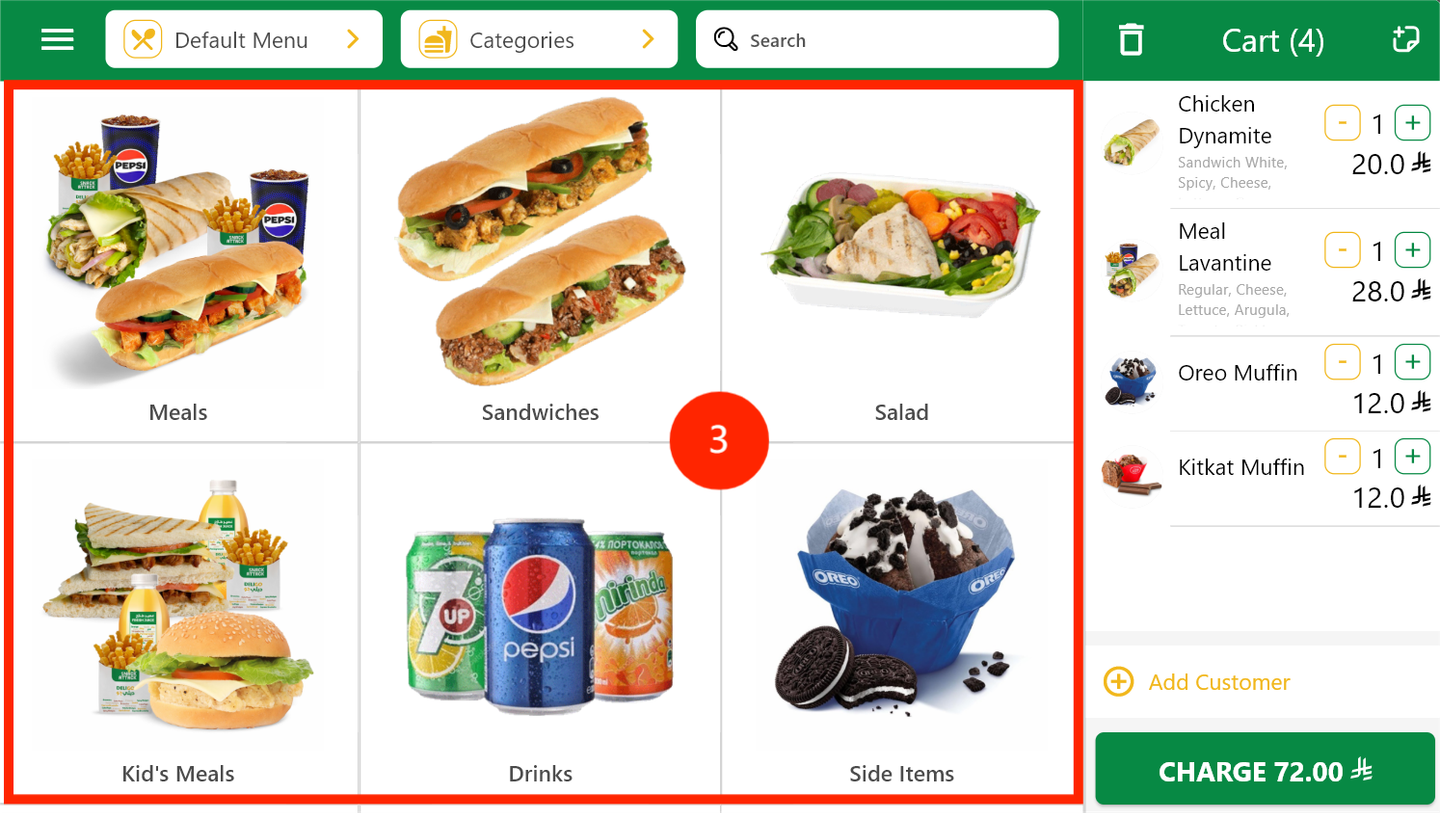
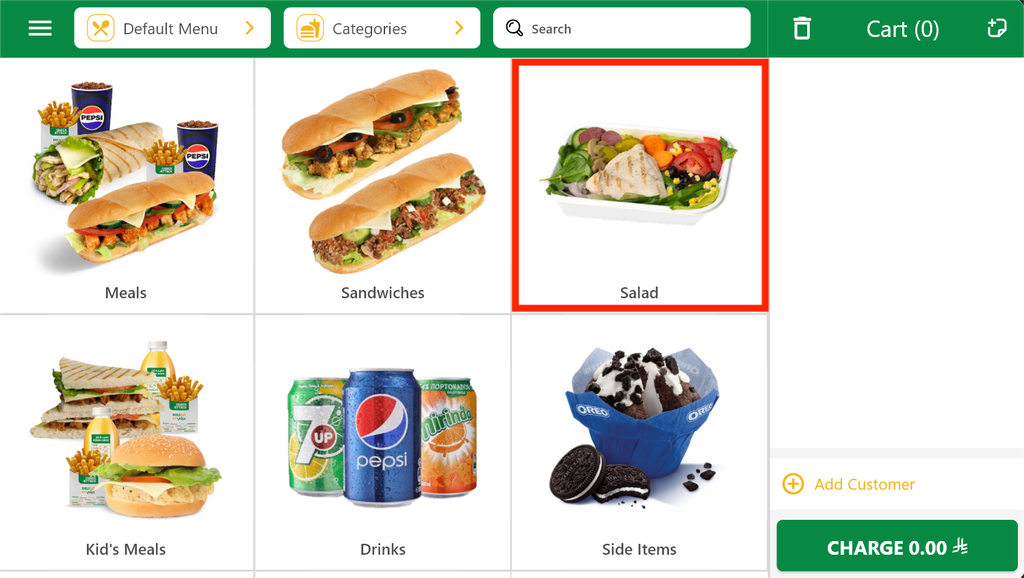
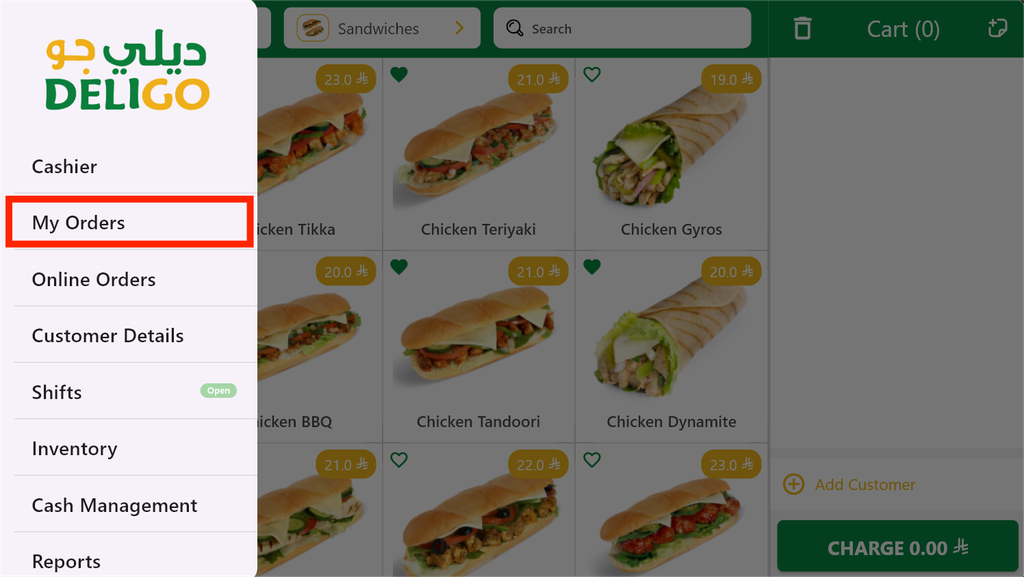
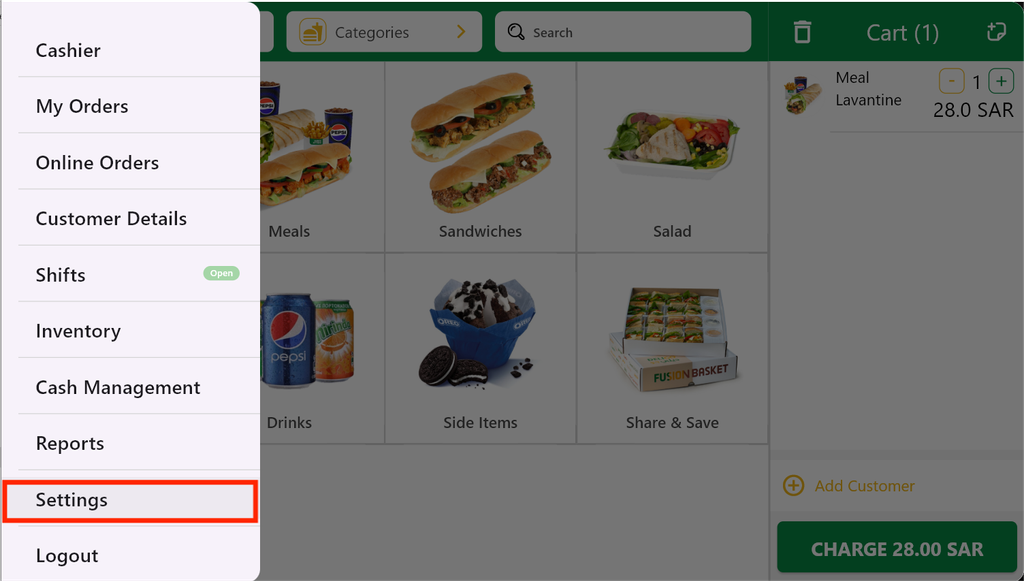
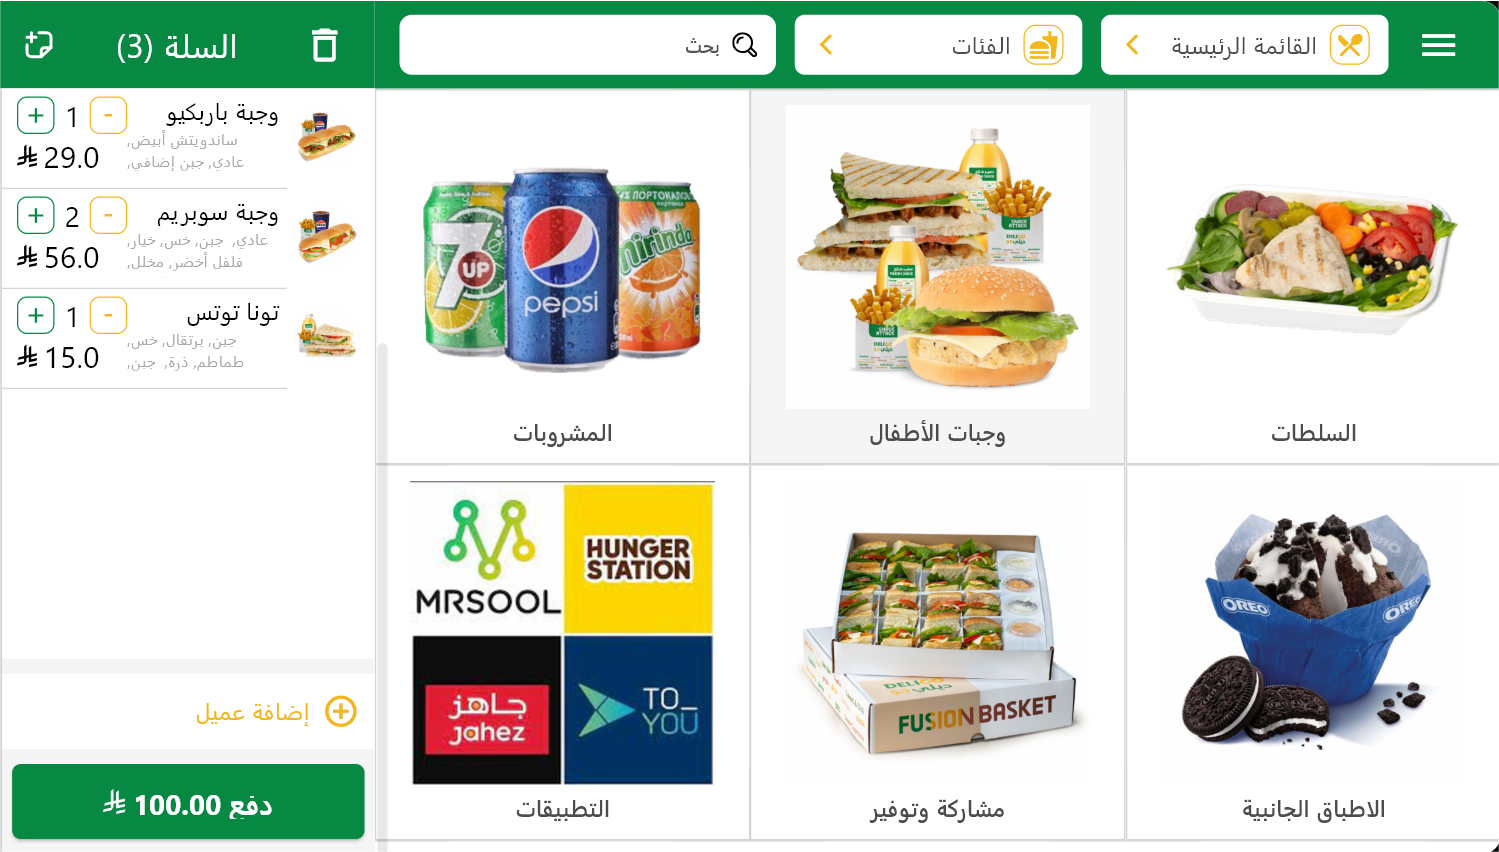
Upon logging in, employees will see the main pos interface.This includes:

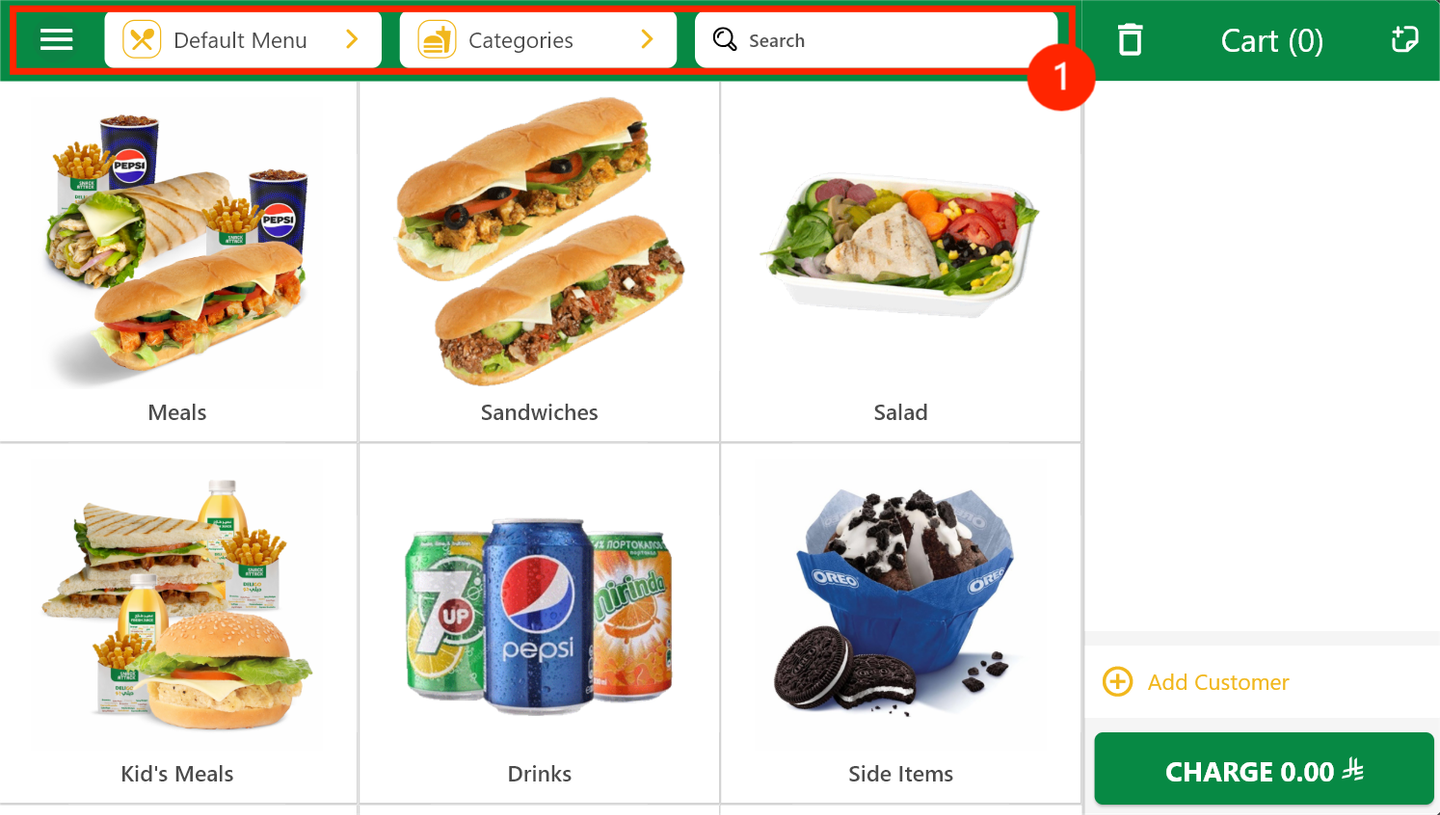
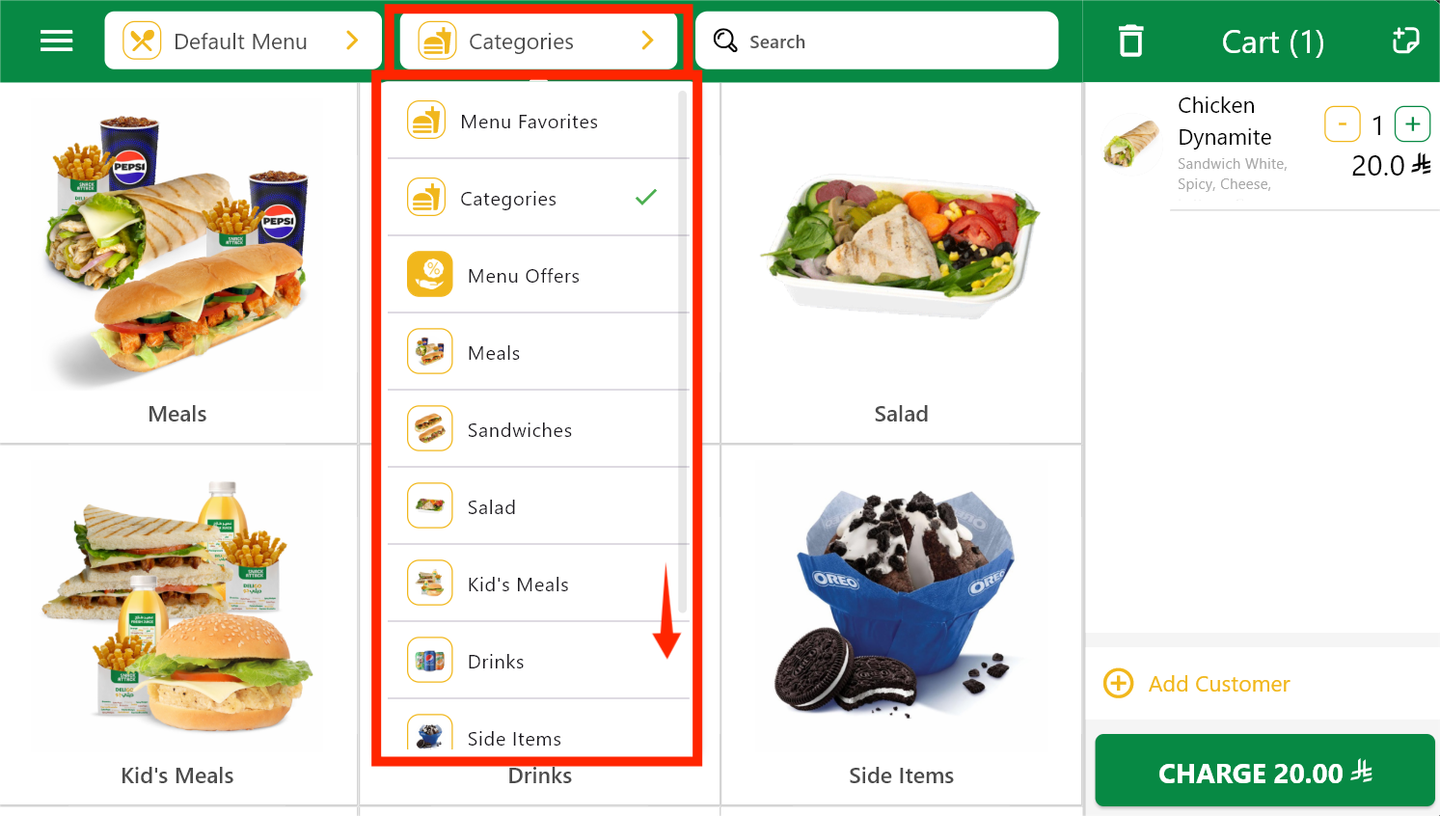
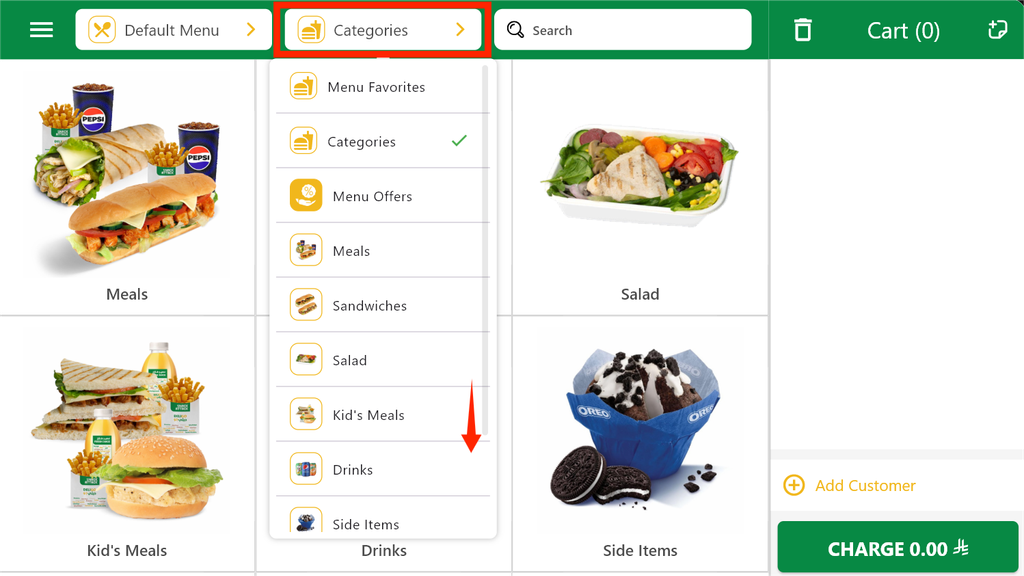
Top Bar (Center, highlighted in red): to filter products by category (e.g., Drinks, Meals).

top bar

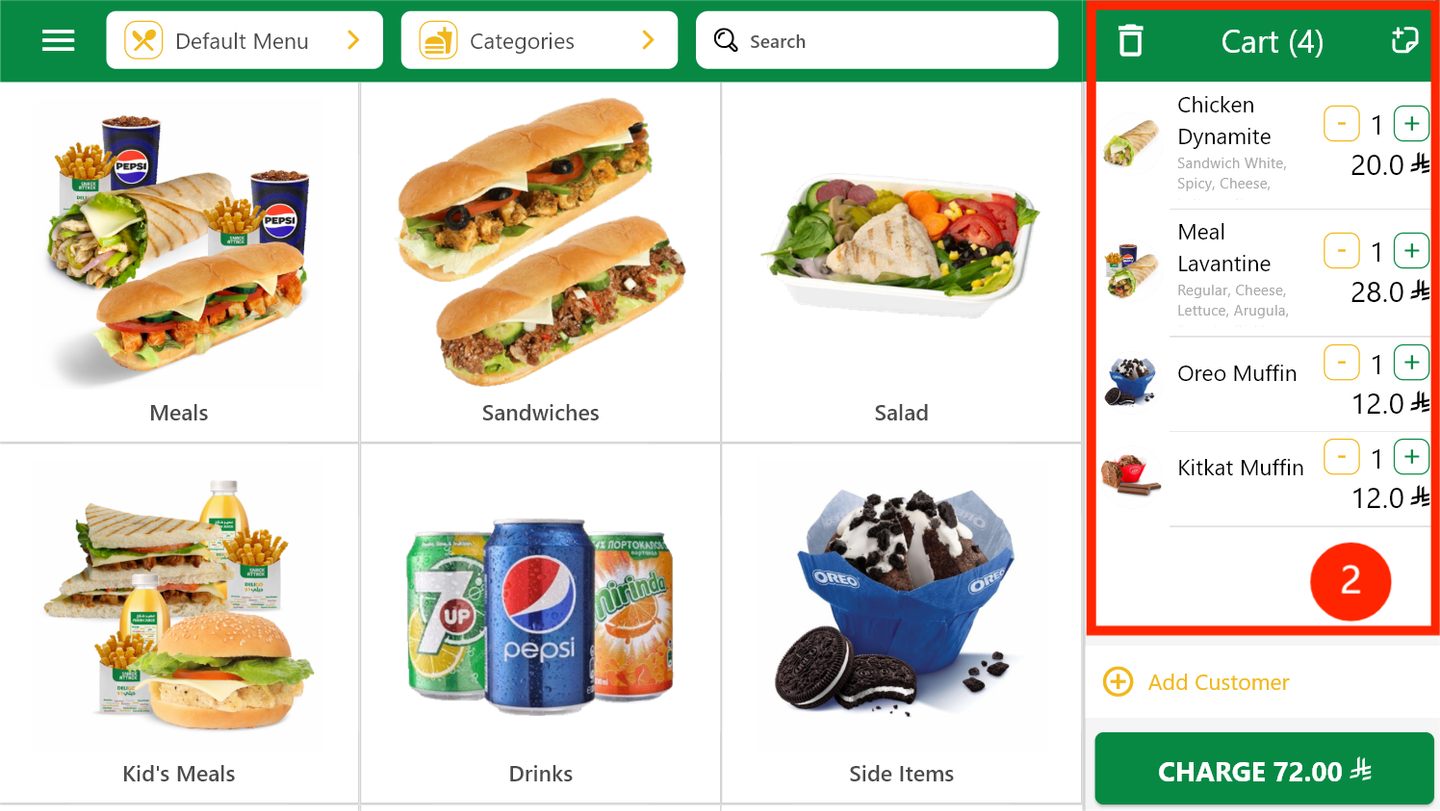
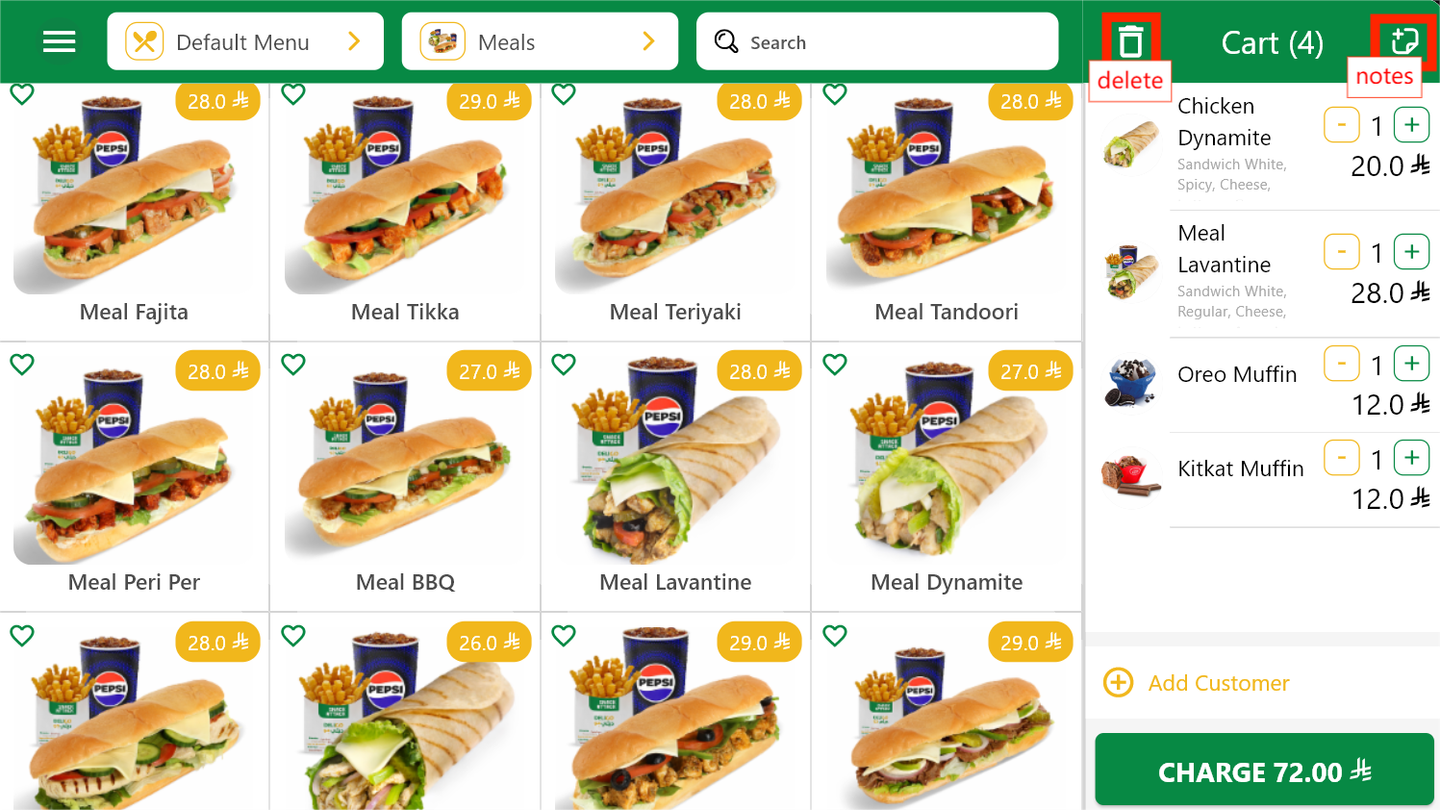
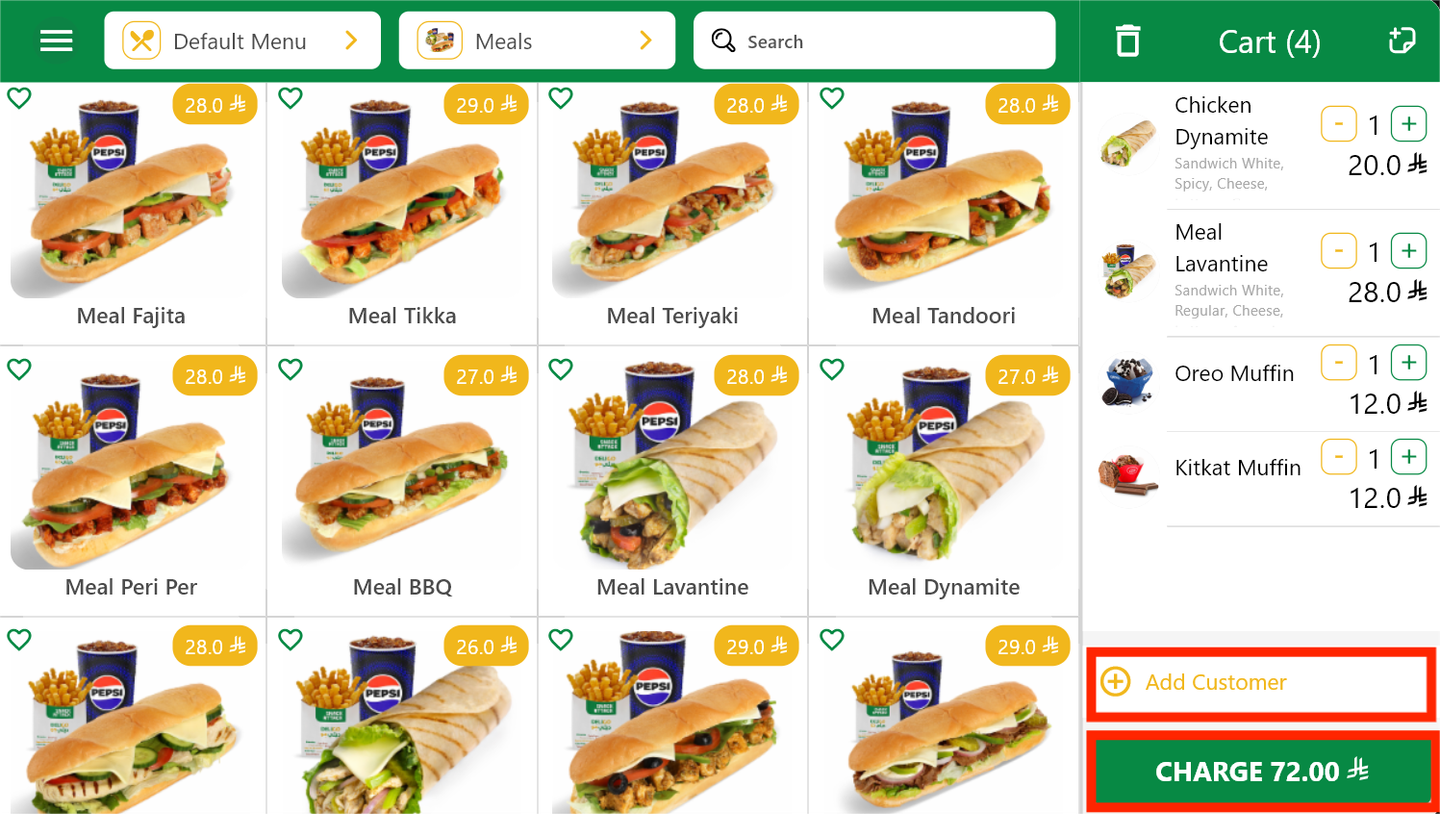
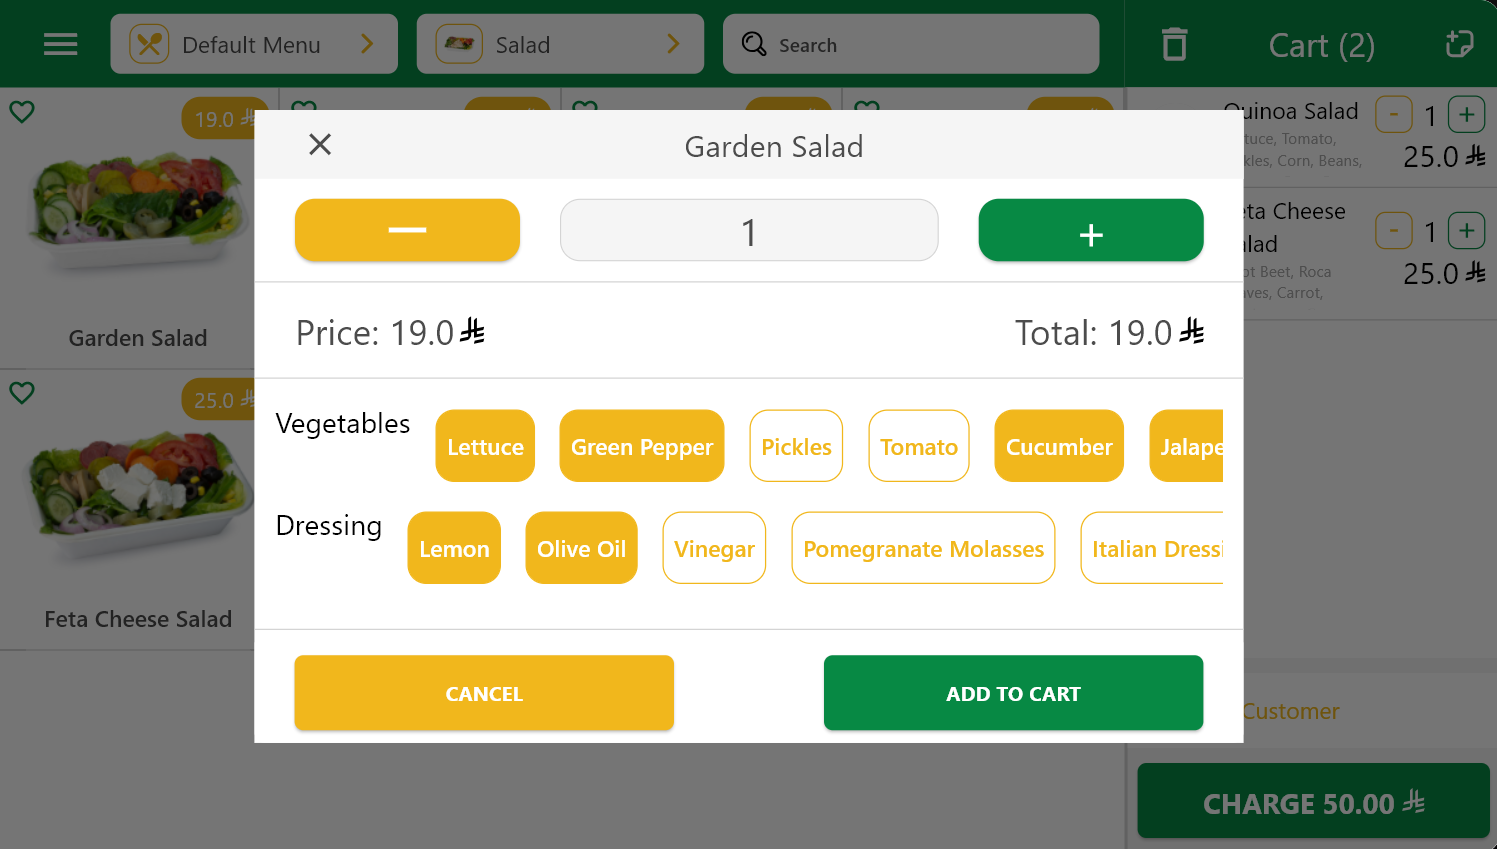
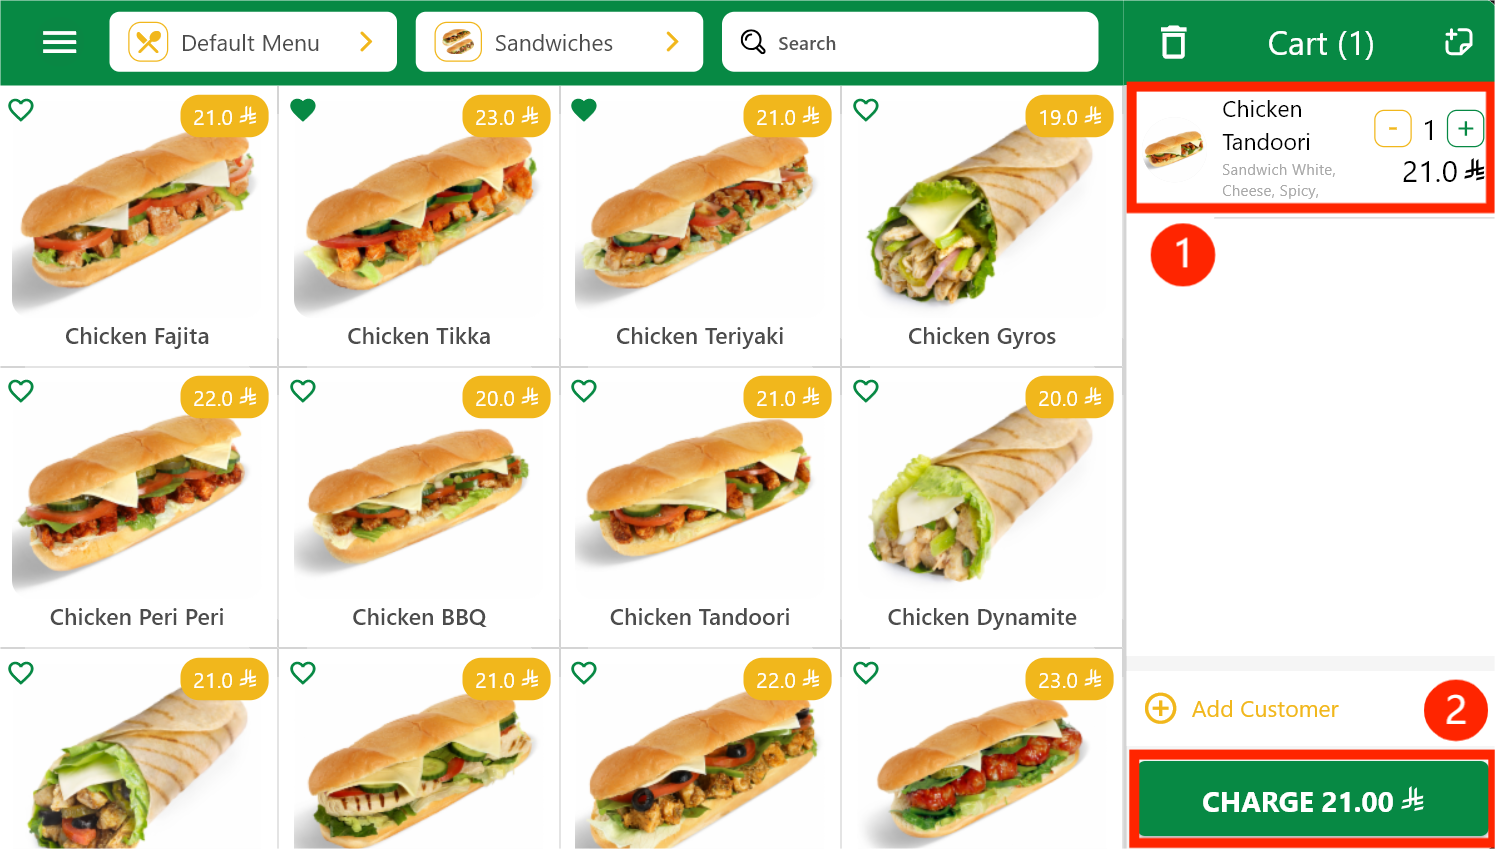
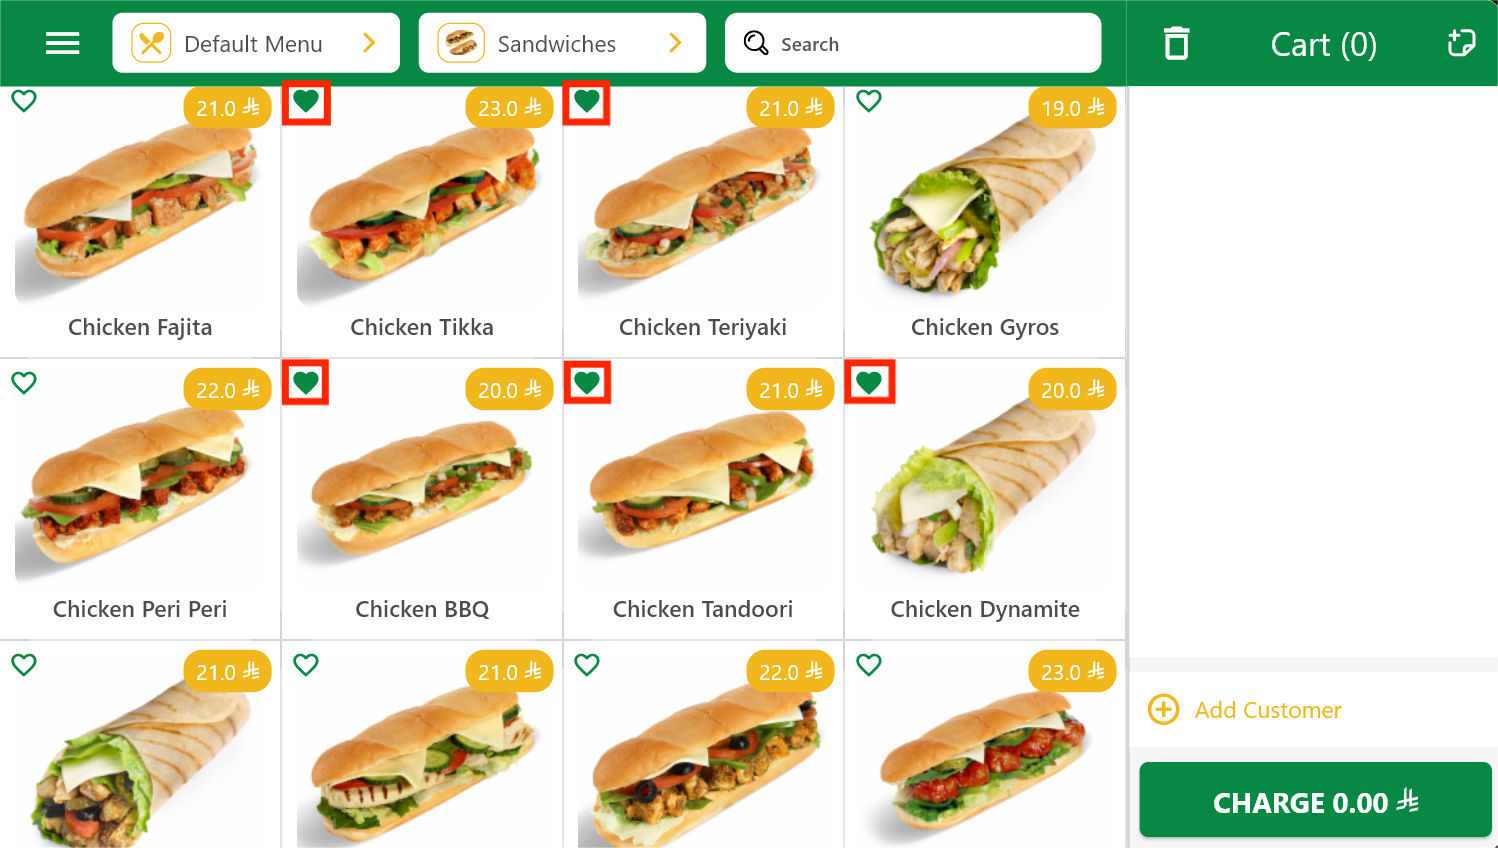
Cart (Right, highlighted in red): Shows items added to the cart with quantity, modifiers, notes, and price.

cart

Category Grid (Center, highlighted in red): Dynamically displays categories including specific products each, to be displayed on Click.

Category Grid

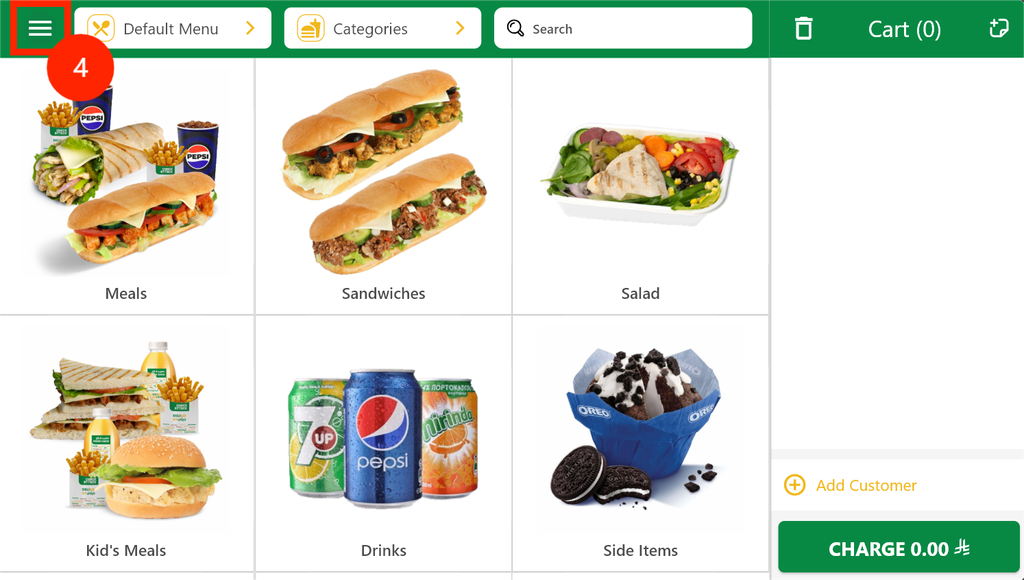
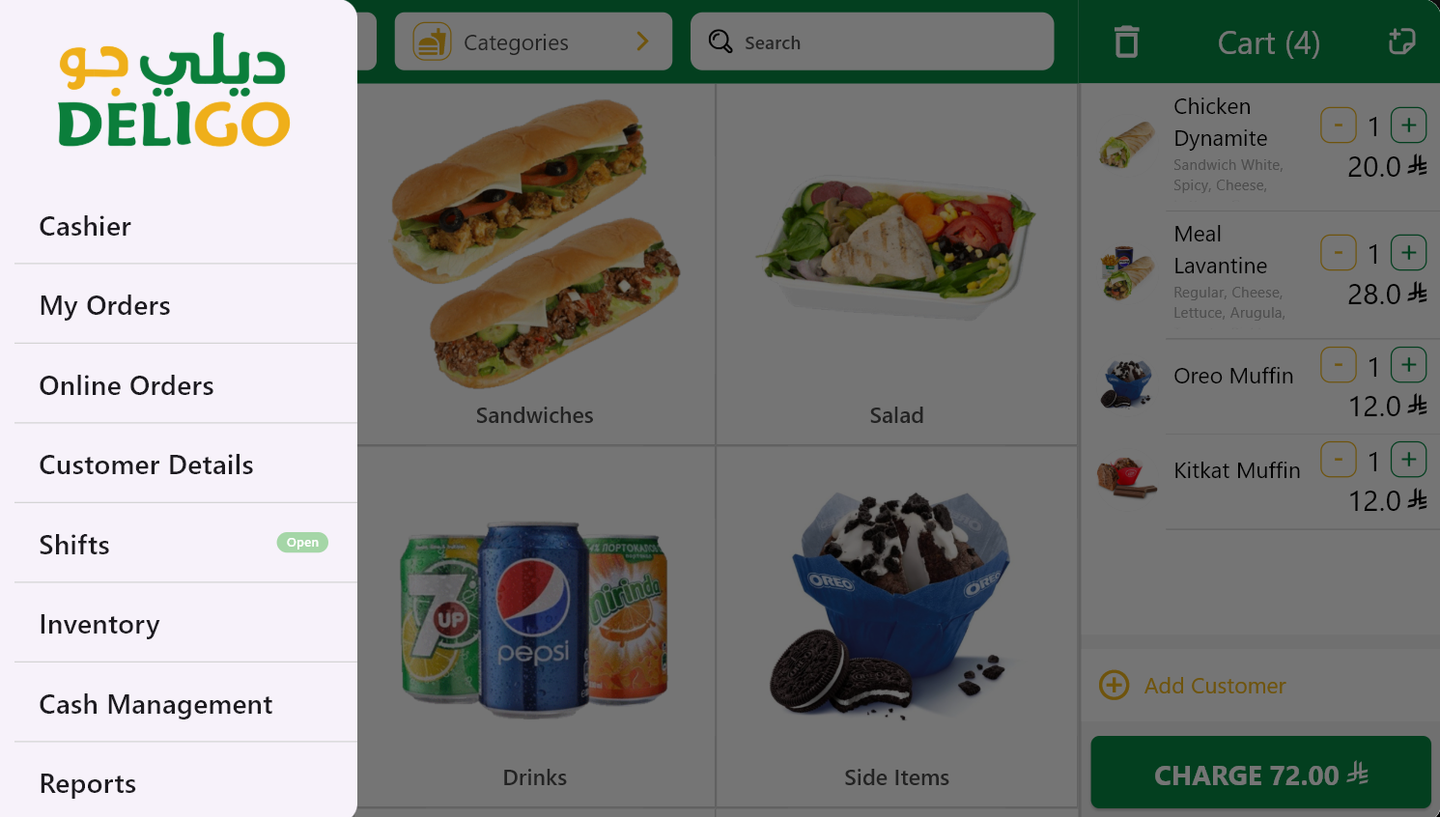
Menu (Right, highlighted in red): Three horizontal lines displaying current user, branch, session status, and language toggle.

menu

The menu displays as follows

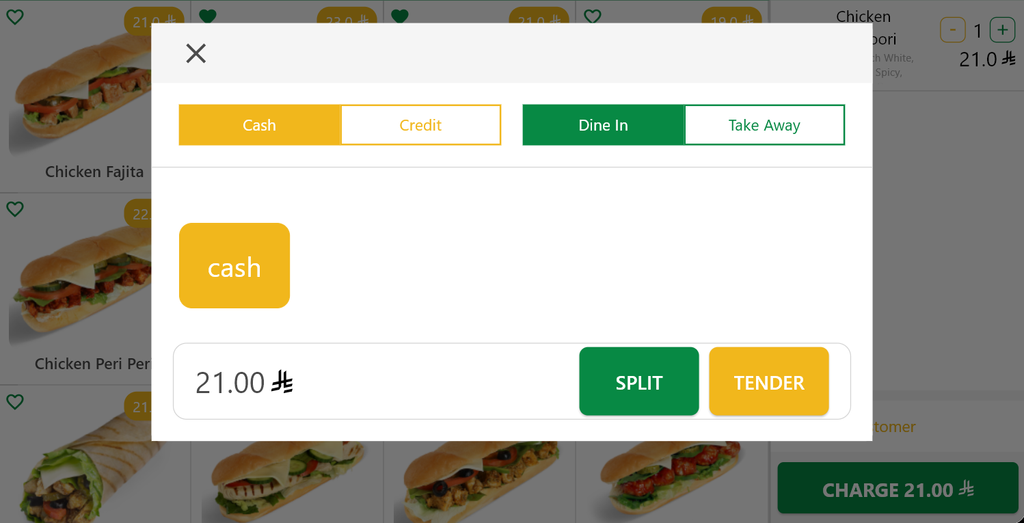
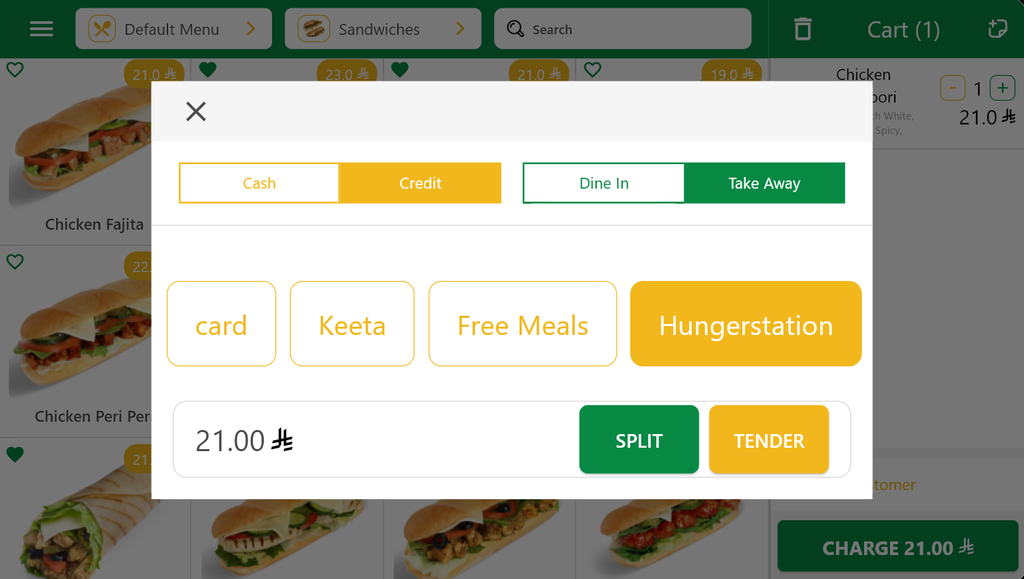
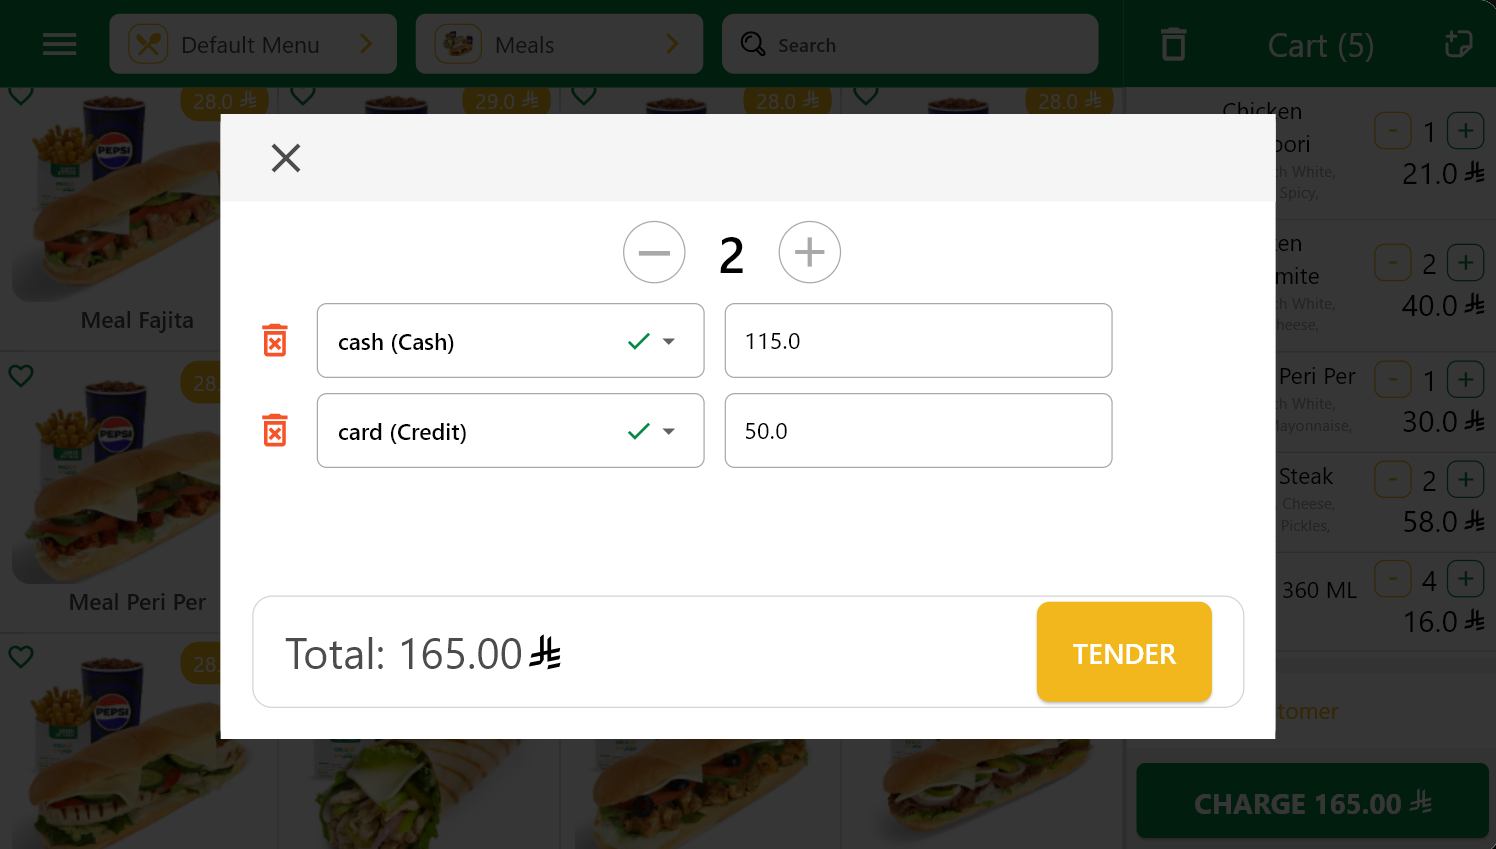
Action Buttons (Right, highlighted in red): Options include Charge, Add Customer, etc.

action buttons (delete and add note)

delete cart products
order note
Add Customer and Charge

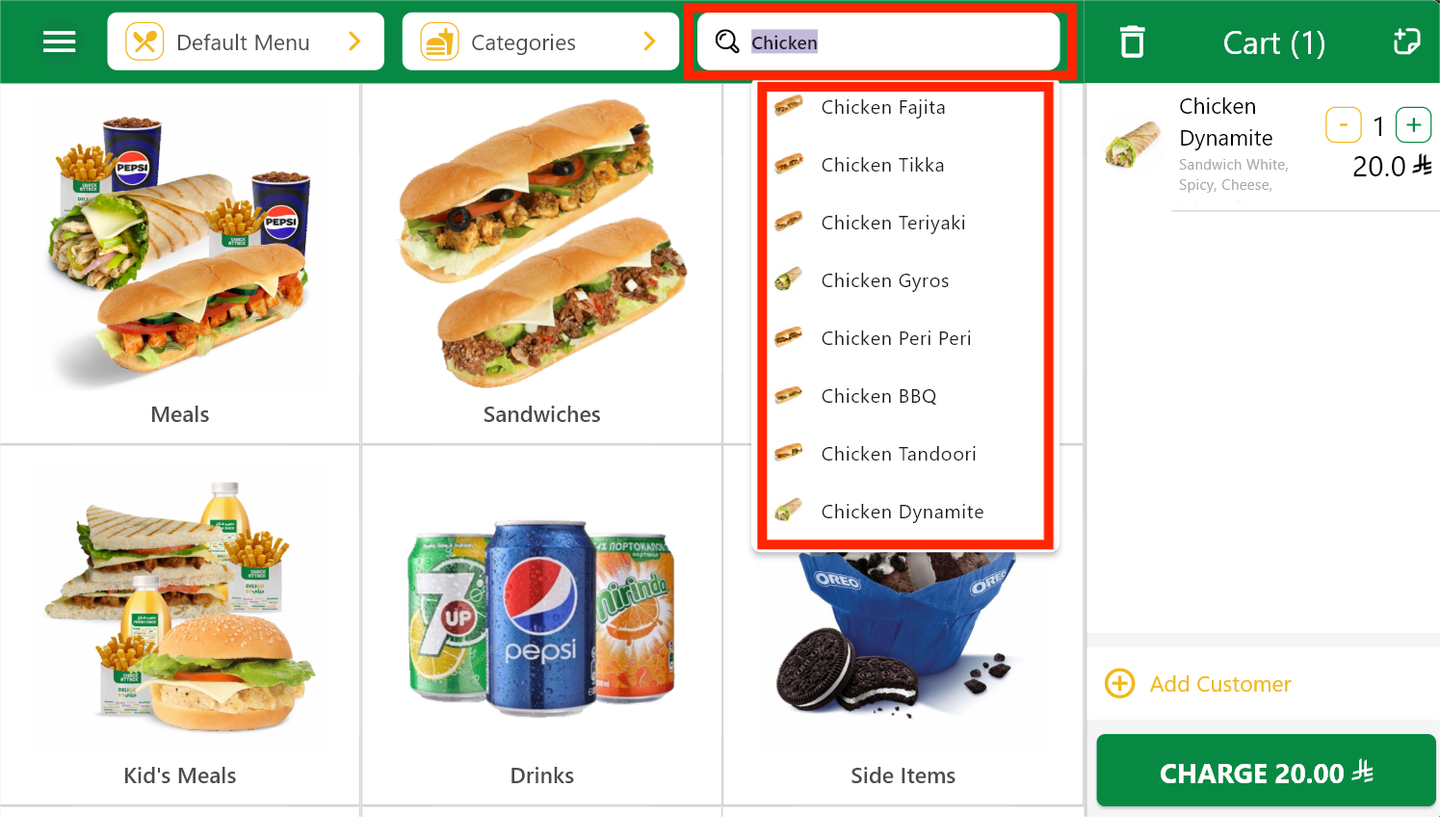
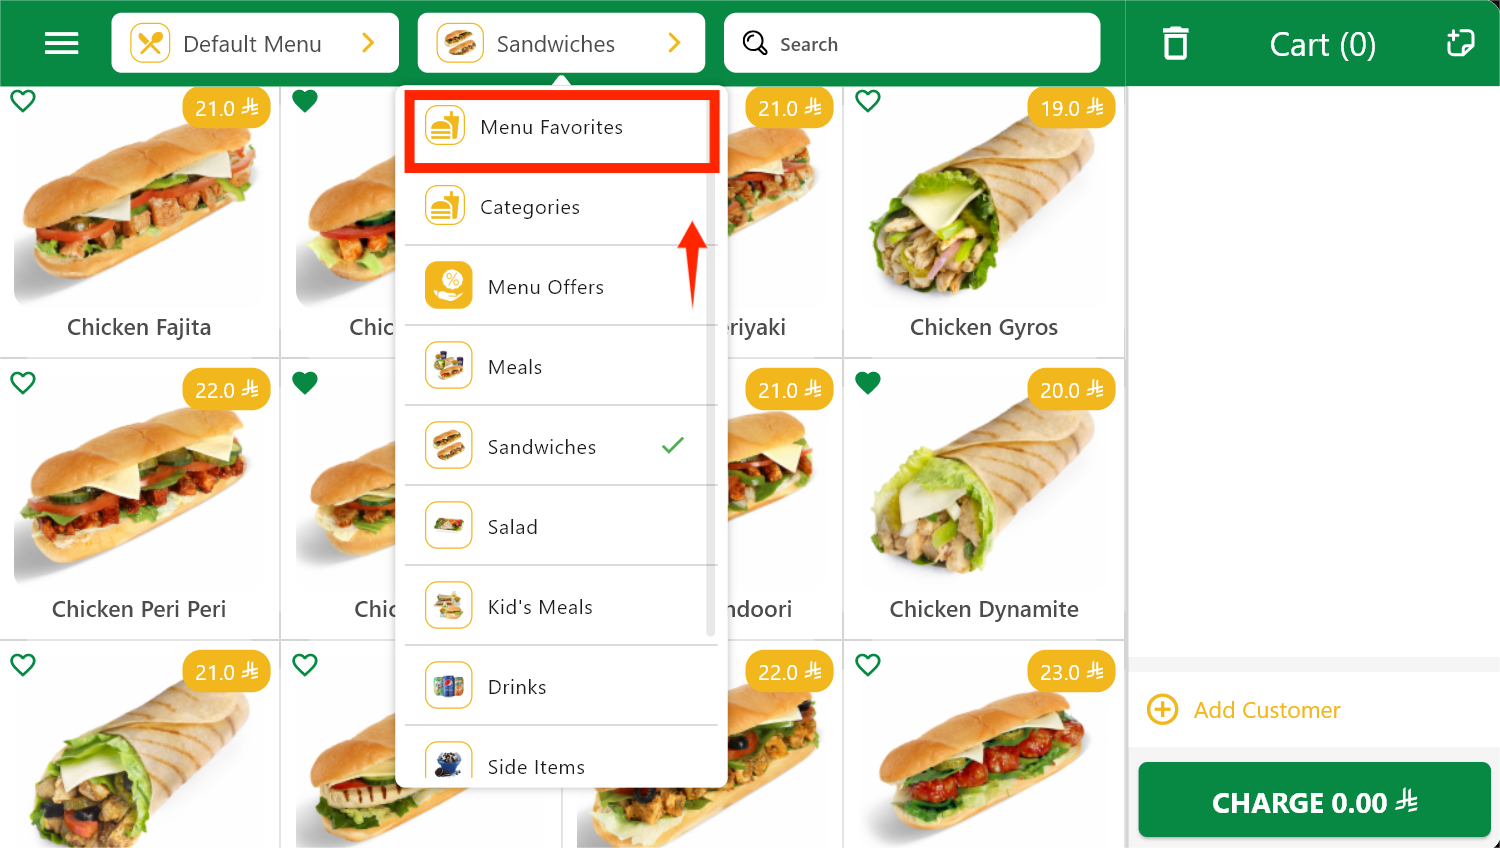
Running a filtered search: navigating the drop-down list (scroll) and the search bar:

Look for a product from the search bar
Scroll through categories via drop-down

Products and Categories

Products are organized into categories to make order-taking fast and intuitive.

Example Categories:

  • Meals
  • Sandwiches
  • Kid's Meal
  • Salades
  • Drinks

How to navigate them?

  • Make sure you’re on the Categories screen page.
  • Tap a category at the bottom or side.
  • The product grid refreshes instantly with relevant products.
navigate-categories
choose-category

To pass an order, you will need to tap a product to add it to the order. *This part will be explained in details in the upcoming sections

Options and Modifiers

If an item has modifiers or notes, it will be shown within it automatically (e.g., "Vegetables", "Dressing").

familly-option

Payments

To lunch an order, you will need to choose a specific product, customize the modifiers and quality to order, then simply add it to cart and pass to the payment options:

familly-option

Choose wither it’s a Dine In order or a Take away, the choose a payment method and click “Tender” to pay.

e.g choose cash payment and Dine In order
or credit payment and a Take Away order

The POS app also supports Split Payments, allowing you to divide a single bill into multiple payment methods, such as cash, credit card, or other options. This is especially useful when one payment method doesn’t cover the full amount for example. Simply click the green “Split” button, choose how you would like to divide the payment, and then click “Tender” to complete the transaction.

menu-favorites

Favorite Products

Many businesses have products that consistently make up 80% of their daily sales. To speed up service and improve upselling, Cloud POS includes a “Favorites” category, specially curated per client.

What Are Favorites?

  • These are best-sellers or popular items.
  • Grouped in a separate “Favorites” or “Top Items” category.
  • Always visible on the main grid for fast, one-tap selection.

Why Use Them?

  • Faster Order-Taking: Staff can find high-demand items instantly.
  • Sales Focus: Encourages pushing top-margin or promo items.
  • Smart UI: Keeps the grid clean by avoiding re-searching each time.

How to set Favorites?

Example use case flow:

A cashier logs in, sees the “Favorites” category with:

  • Chicken Tikka.
  • Meal Pesto Mix.
  • Oreo Muffin.

The customer asks for a combo, one tap adds it to the order. The cashier proceeds to checkout without navigating multiple tabs.

favorite-product

To access the “Menu Favorites” just click on the middle drop-down list in the top bar, and look for “Menu Favorites” then click on it, as shown below:

menu-favorites

My Orders

To view all of your orders, tap on “My Orders”, and select your preferred view:

my orders
my order

my-orders
My Orders in a grid view

Customer Details

The Customer Details section in the POS app allows you to add or select a customer during a sale, enabling personalized service and better tracking. You can enter key information like name, phone number, and notes, which helps with customer history, receipt customization...etc. This feature is key in customer management and ensures a smoother experience.

customer-details

To add a customer (individual or company) from the PoS App, click the + button previously highlighted in red, and the following window open, make sure to fill it with the proper contact information:

online-orders

Shifts

Shifts help organize and track employee activities and payments across defined working hours, for accountability and shift-based reporting.

Use cases:

  • Open/Close Shifts with summaries.
  • Record Cash drawer totals.
  • Prevent discrepancies in daily balances.
  • Assign sessions to specific employees or roles.

Opening a Shift

Provide the steps and interface for opening a new shift:

  • Staff logs in
  • Shift timer begins
  • Cash drawer (optional) is opened and initial balance entered.
open-shift
After choosing the login employee, enter the start “Cash Amount ” to lunch a new shift session

Closing a Shift

Provide the process for shift closing, including confirmations:

  • All orders reviewed and closed.
  • Cash balance compared to sales.
  • System auto-generates shift report.
  • Manager approves and archives session.
close-shift
Click on “Close Shift” and the following window appears

Benefits
  • Prevents double logins.
  • Ties all orders and payments to a user.
  • Detects discrepancies or refunds.

Shift Report


A Shift Report is a detailed summary of all transactional, financial, and operational activities that occurred during a cashier’s shift. It is generated at the end of each session to help store managers and business owners track sales, cash flow, and employee performance. The report ensures full transparency and supports reconciliation of sales and payments with actual cash in the drawer.

1. Shift & Staff Information

This section includes general shift identifiers:

  • Store Name
  • Date & Time of the Shift
  • Employee Name (who initiated the report)
  • POS Terminal used

This part helps in identifying when and where the shift took place and who was responsible.

2. Sales Summary

A breakdown of the sales activity:

  • Total Sales: Full value of all completed orders
  • Discounts: Any applied promotional or manual discounts
3. Net Sales & Tax Breakdown
  • Net Sales (Including VAT)
  • Total VAT
  • Net Sales (Excluding VAT)
4. Payment Methods
  • Cash
  • Credit/Debit Cards
  • Digital Wallets (e.g., Keeta)
  • Other Methods
5. Cash Drawer Summary
  • Opening Amount: The initial cash in drawer at the start of the shift
  • Closing Amount: Cash counted at the end of the shift
  • Required Cash: System-expected cash based on sales and transactions
  • Variance: Difference between actual and expected cash (should be zero)
6. Refunds & Corrections
  • Refund Value: Total value of returned orders
  • Order Refunds: Number of refunded orders
  • Item Corrections: Adjustments made to specific items
  • Order Voids: Cancelled orders that were not finalized
7. Cash Movement
  • Cash In (Paid Ins): Manual additions to the drawer
  • Cash Out (Paid Outs): Manual withdrawals from the drawer
8. Performance Summary
  • Total Transactions: Number of completed orders
  • Total Sales (Final)
  • Average Ticket: Average amount spent per transaction
shift-report

Employee Management

Manage your team with flexible user roles and permissions via the cloud dashboard.

employee-management
-Admin Role- POS section of the Cloud

Roles Management

  • Admin: Full system access, including settings configuration, user management, report generation, product and category updates, and integration setup. Admins can oversee all operations across locations and have the highest level of control.
  • Store Manager: Oversee operations, view reports, manage shifts, and handle daily activities within assigned locations. Limited access to critical system settings.
  • Staff: Restricted access to POS and basic functions such as placing orders, processing payments, and viewing assigned tasks. Ideal for cashiers and service staff.
Actions:
  • Add/Edit/Remove Employees.
  • Assign roles and permissions.
  • Track employee login times and activity.
  • Monitor performance through analytics.

Inventory

Go to Inventory Site

Please follow this link to get a dedicated user manual for the inventory section.

inventory

Cash Management

Cash Management helps monitor daily cash flow. It allows users to record cash-in (e.g. starting cash or added funds) and cash-out (e.g. expenses or cash removal) transactions. This ensures transparency, accountability, and accurate reconciliation during shift changes or at closing.

Add cash-in amount following the steps showed in the illustrations below:

cash-in
cash-in-note

Follow the same previous steps, just disable the Cash In to enable Cash Out status.

cash-out
cash-out-note

cash-management
Successfully added Cash-in and Cash-out Amounts
  • You can delete the cash ins and cash outs at any moment by clicking on the “orange bin icon” on the right.

Reports

The Reports section in the POS app offers comprehensive, easy-to-understand analytics that help you track and manage your business performance. You can view real-time and historical data on sales, product performance, inventory usage (if enabled), and order history. These reports assist in making data-driven decisions, identifying trends, and improving overall operational efficiency.

1. Product Sales Report

Provides detailed data on products sold within a selected timeframe, including quantities sold, total revenue, and average price per item, helping you track your best-selling items and manage stock accordingly.

product-sales
2. Consumption Report

This report is only available when the inventory module is enabled. It tracks how much raw material or ingredients are used based on orders placed. For more details on using this feature.

please refer to the Inventory User Manual.

Go to Inventory Site
3. All Orders Report

Displays a complete list of all orders processed through the POS, including date, time, payment method, order type (dine-in, delivery, etc.), and order status. Useful for full operational reviews and reconciliation.

all-orders

Settings

The Settings page in the POS app provides key tools for managing system behavior and customization. It includes options to reset or update data, disable the kitchen display, change the app language, sync offline orders with the server, and configure the cashier interface. Additional tabs allow you to add and manage printers for receipts and reports, connect an external terminal , link a cash drawer , and adjust printing preparation settings for efficient operation.

To access the Settings page, click on the menu on the left, then scroll down to settings as follow:

settings-access
1. Settings

The Settings screen is presented as follow

settings

Where the orange buttons serves to:

  • Reset Data: Clears locally stored temporary data without affecting your main system or sales history, helpful for refreshing the app state.
  • Update Data: Syncs and pulls the latest data and updates (products, categories, prices) from the cloud server to ensure your POS is up to date.
  • Disable Kitchen App: Temporarily disconnects the kitchen display system, useful during maintenance or if it's not needed.
  • Sync Orders to the Server: The user doesn’t use the kitchen here, and he manually pushes un-synced offline orders to the cloud, ensuring that all transactions are securely backed up.
  • Cashier page configuration

  • Number of categories in row: with this feature we can customize the number of categories showing in a row, for example 3 categories showing in a row.
  • Number of products iwith this feature we can customize the number of products showing in a row, for example 4 products showing in a row.n row:
2. Printer

Configure and manage receipt or report printers. Add compatible printers, test connections, and assign them to specific order types or stations.

printer
3. External Terminal

Link an external payment terminal for card transactions. This ensures seamless integration between the POS and payment processing device.

external-terminal
  • IP Address: The network address of the external payment terminal that allows the POS to connect to it.
  • Request Code: A code used by the POS to initiate secure communication with the terminal.
  • Access Code: A security key that verifies and authorizes the POS to interact with the terminal.
4. Cash Drawer

Connect a supported cash drawer to manage physical cash securely. Automatically triggers opening upon transactions or manual commands.

cash-drawer
5. Printing Preparation

Set printer and print layout preferences for receipts, based on a specific category, ensuring professional, clear printouts.

printing-preparation

Multilingual UI

Employees can instantly switch between Arabic ↔ English from the interface.

change-language
arabic-version

You can now navigate to the “Cashier” screen, and make your orders as explained in the previous sections, but this time in Arabic, as well as navigating all the other parts of the apps and using all of its features.

multilingual-UI

Conclusion

In conclusion, this POS user manual provides a clear and practical guide to using the system efficiently, from managing sales and customers to configuring settings, handling cash operations, and integrating external devices. With its user-friendly interface and comprehensive features, the POS app is designed to streamline your business operations, improve accuracy, and enhance the overall customer experience. Whether you're a new user or an experienced operator, this manual equips you with the essential knowledge to make the most of your POS system.