Cloud Administration

Overview

Used to manage cloud infrastructure services and multiple server instances, and also, to establish and execute the operations as per the specifications and parameters.

The cloud administration is composed of 11 sections: dashboard, kitchen, admin chat, admin chat, client, online, marketing, POS, menu, inventory, customization, and reporting, each section is reserved for a specific operation, although some of them are directly related.

employee login to an existing shift

Login In

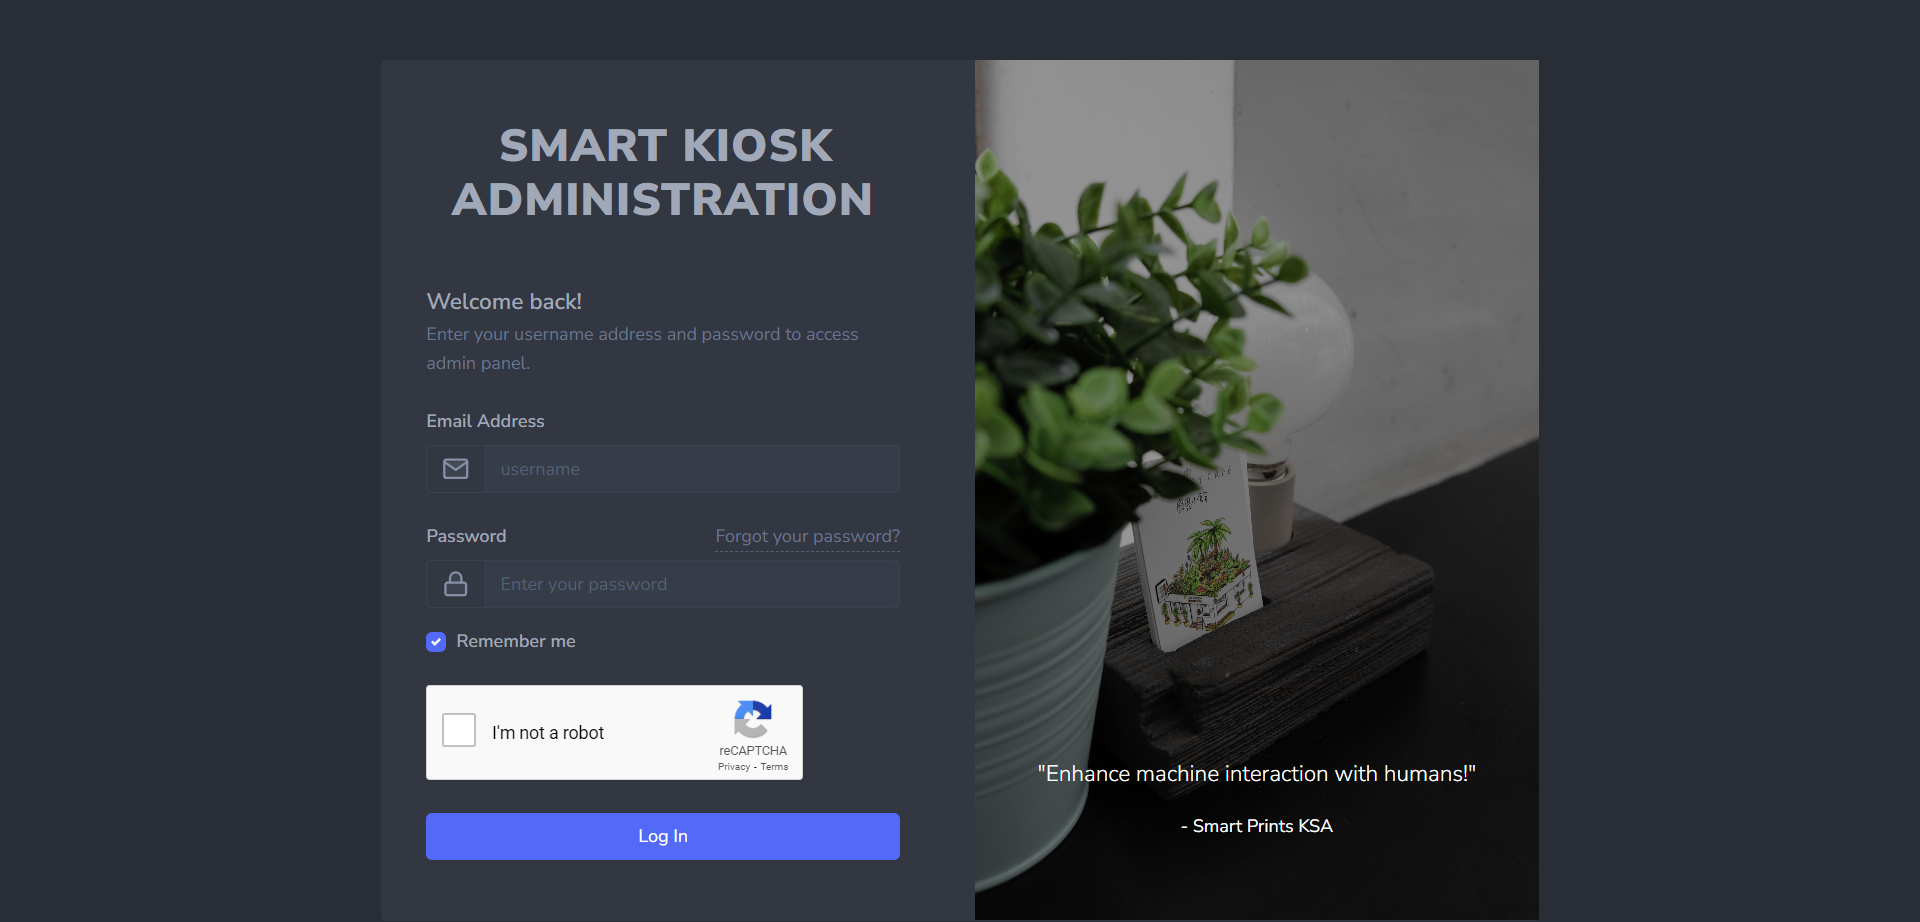
To access the Smart Kiosk administration, you should follow this straightforward login process:

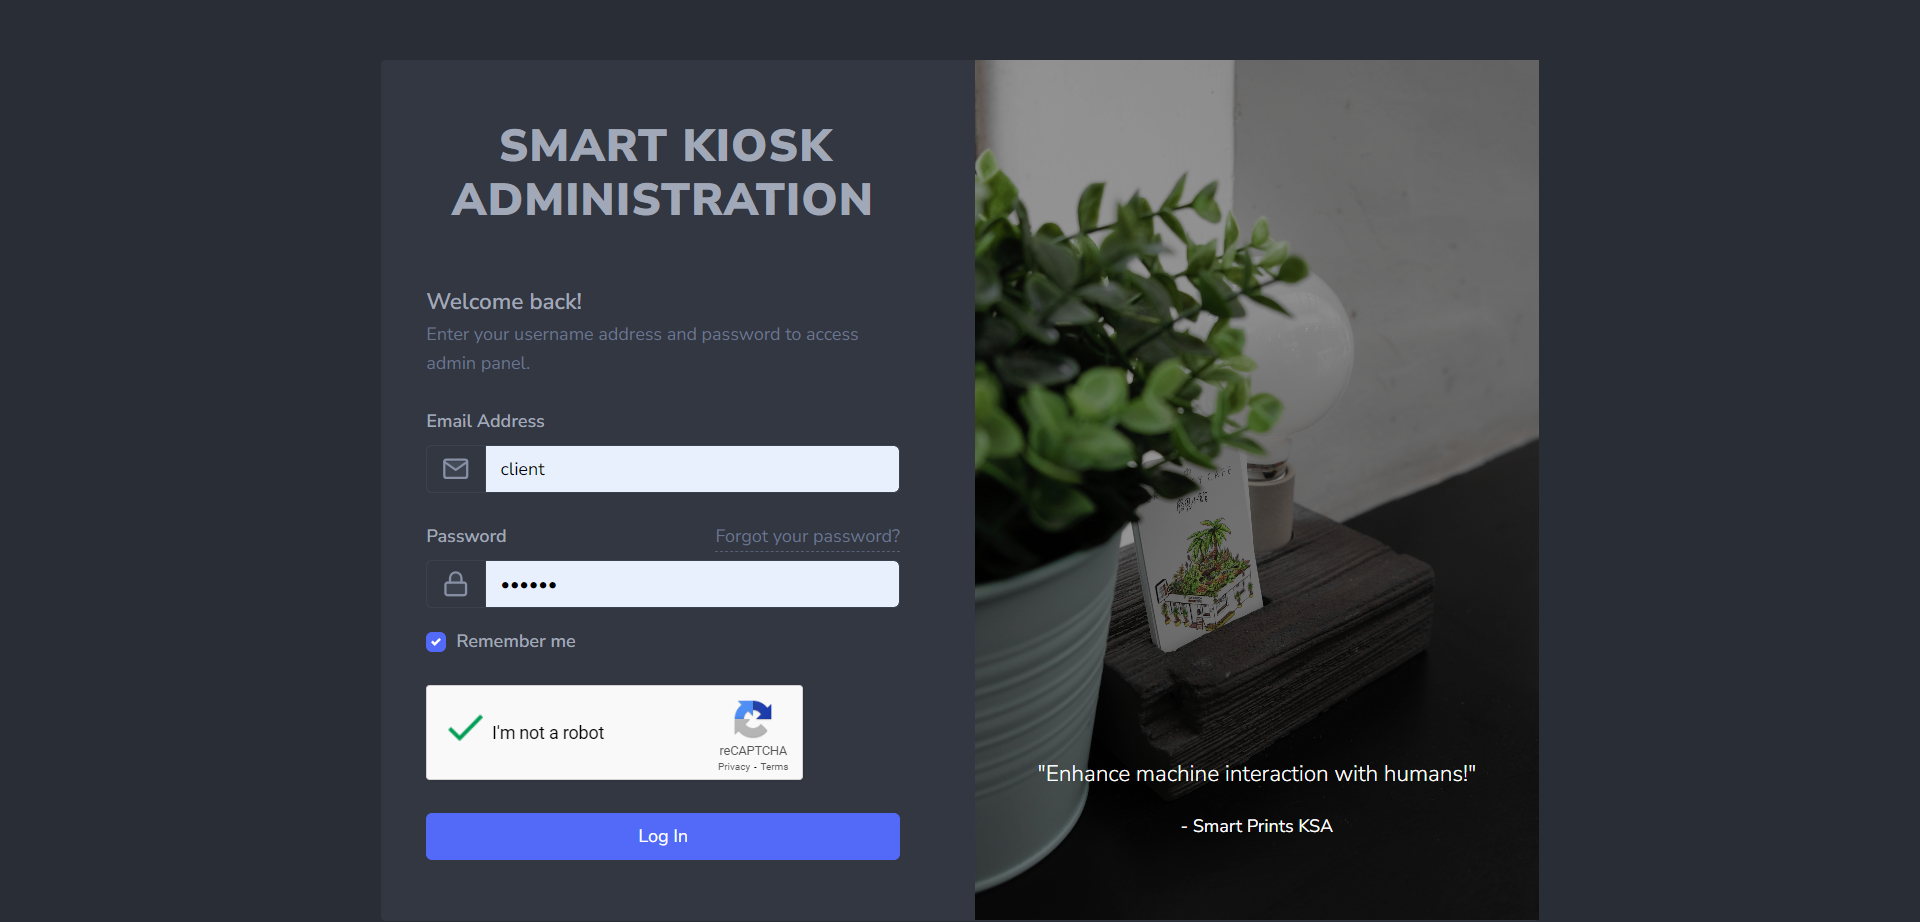
  • Username or Email and Password: You will be handed a Client Manager account with which you will log in using your designated username or email and a secure password.
  • employee login to an existing shift
  • Captcha Test: After completing the previous step, and as an additional security measure, it is necessary to complete a simple CAPTCHA test by clicking "I'm not a robot" for successful login.
  • employee login to an existing shift
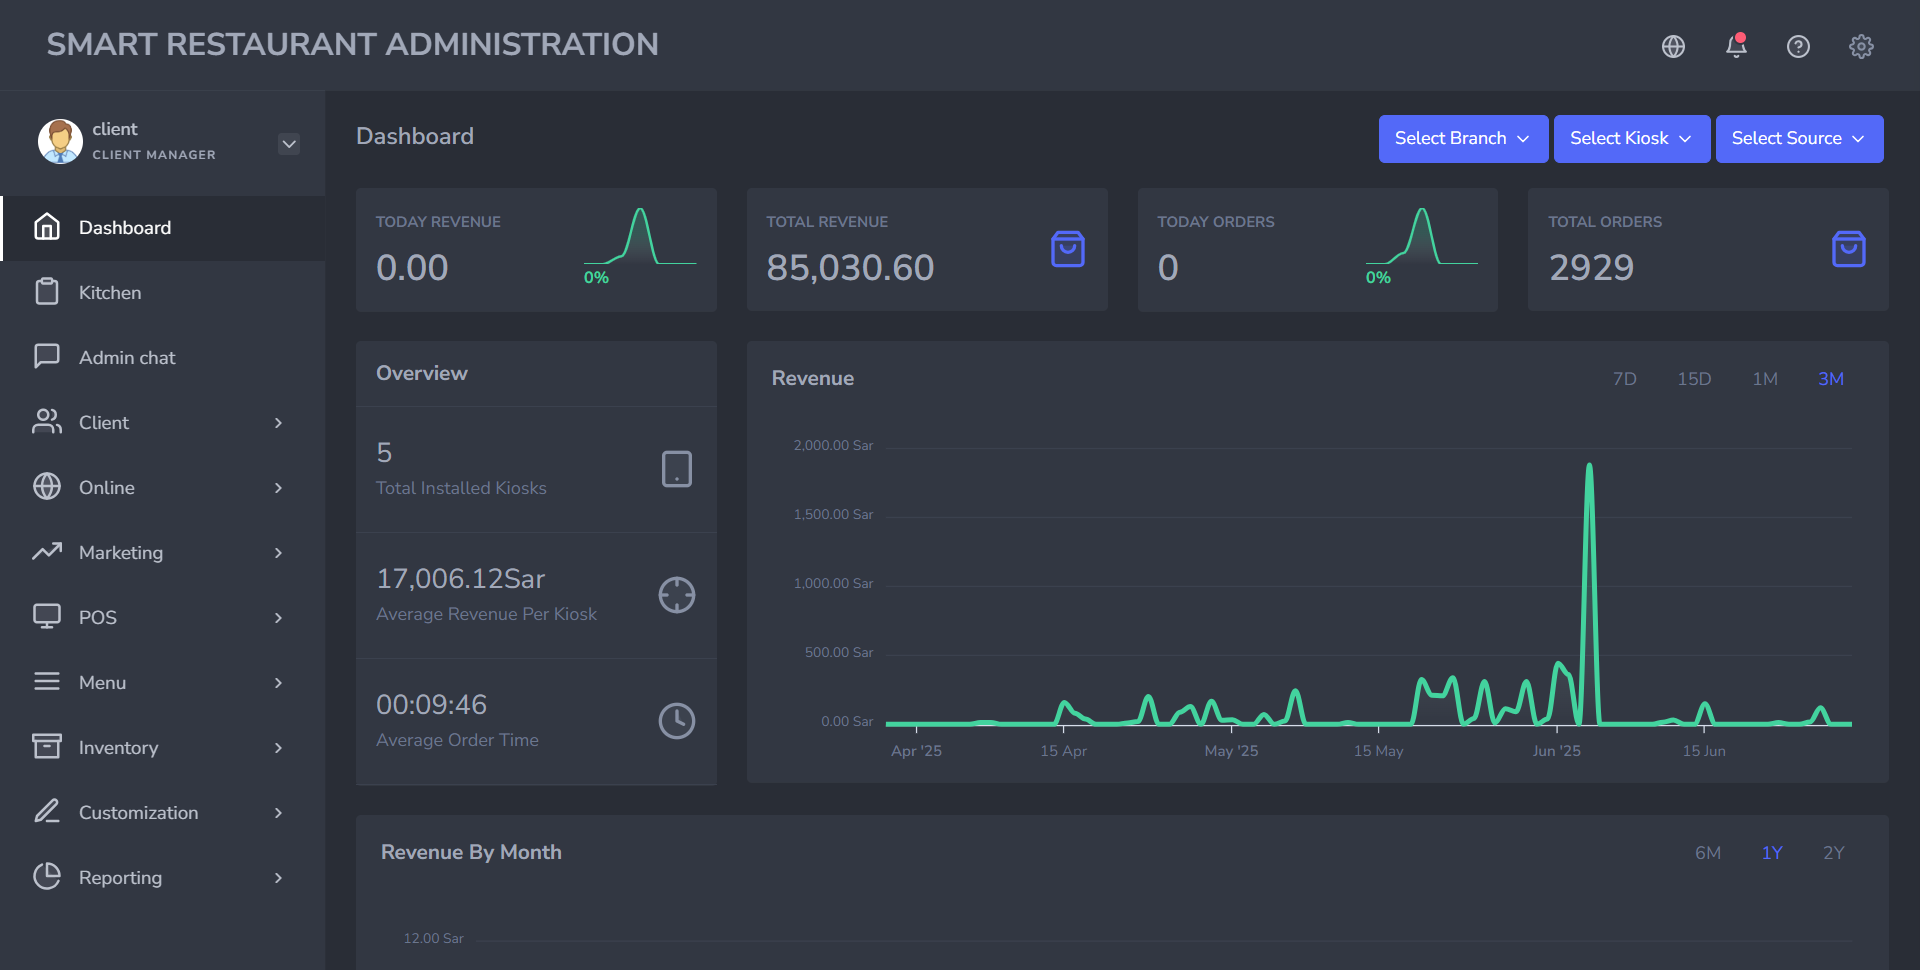
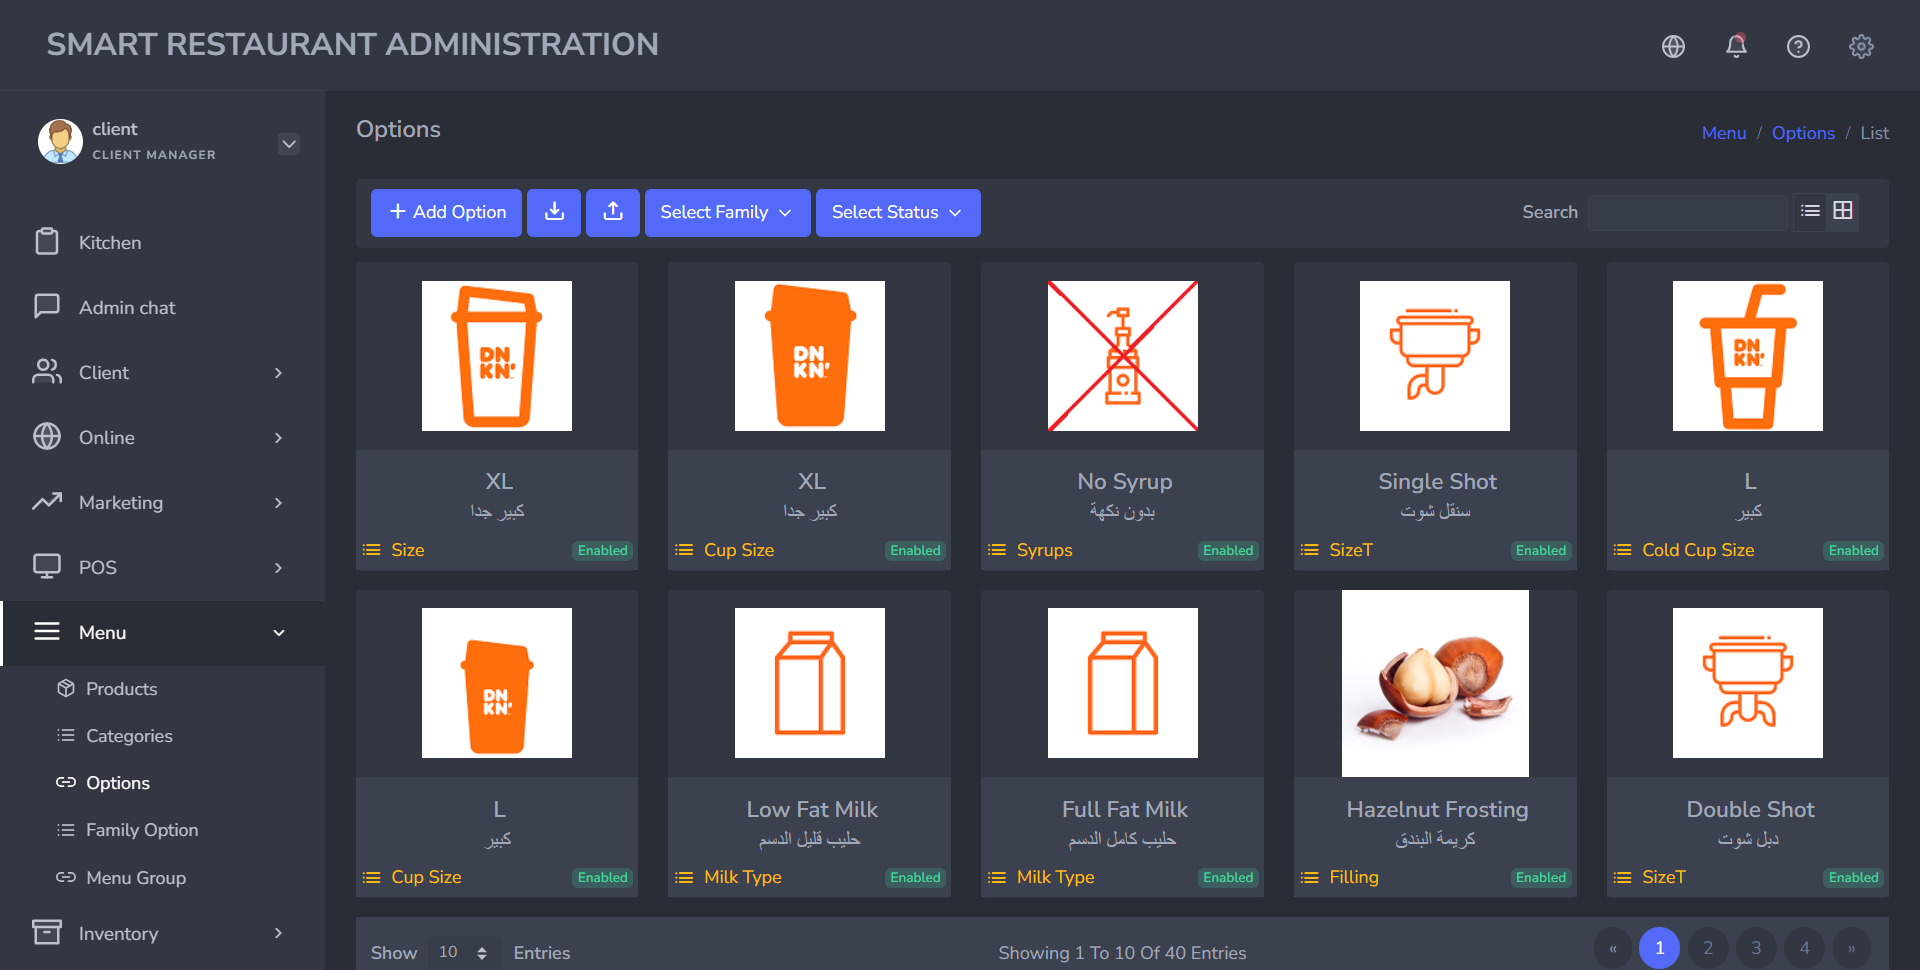
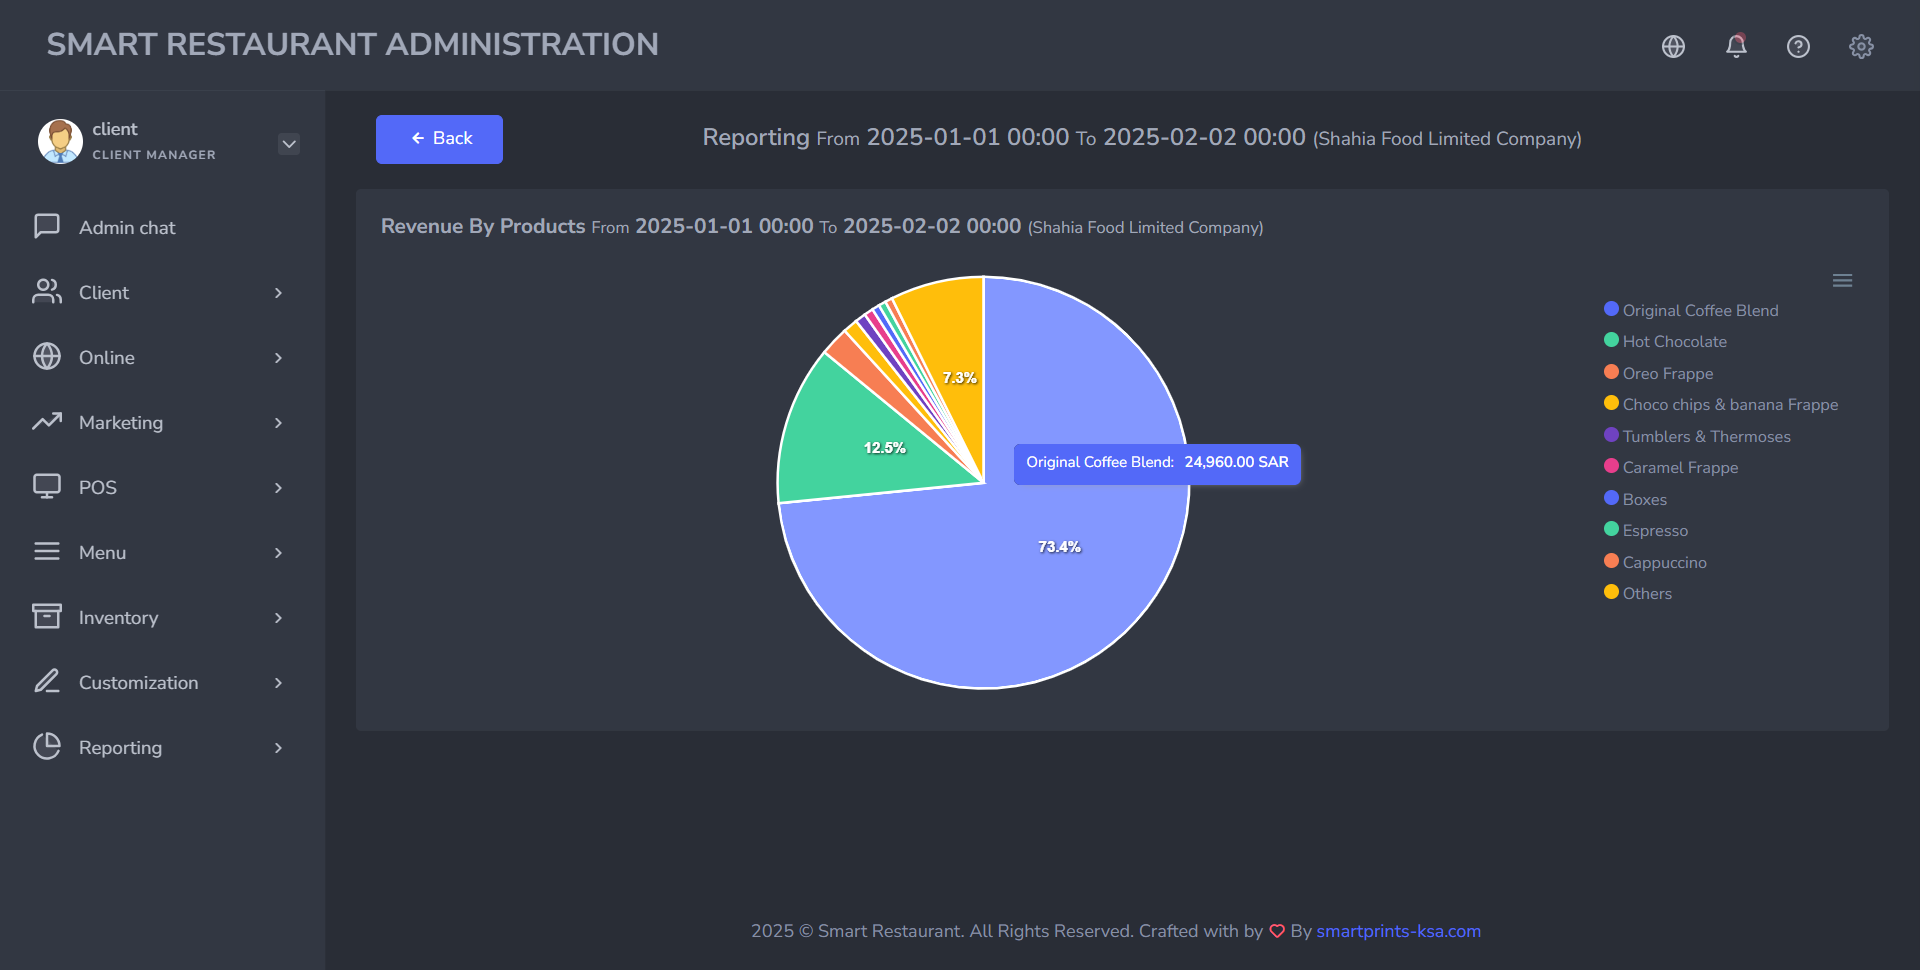
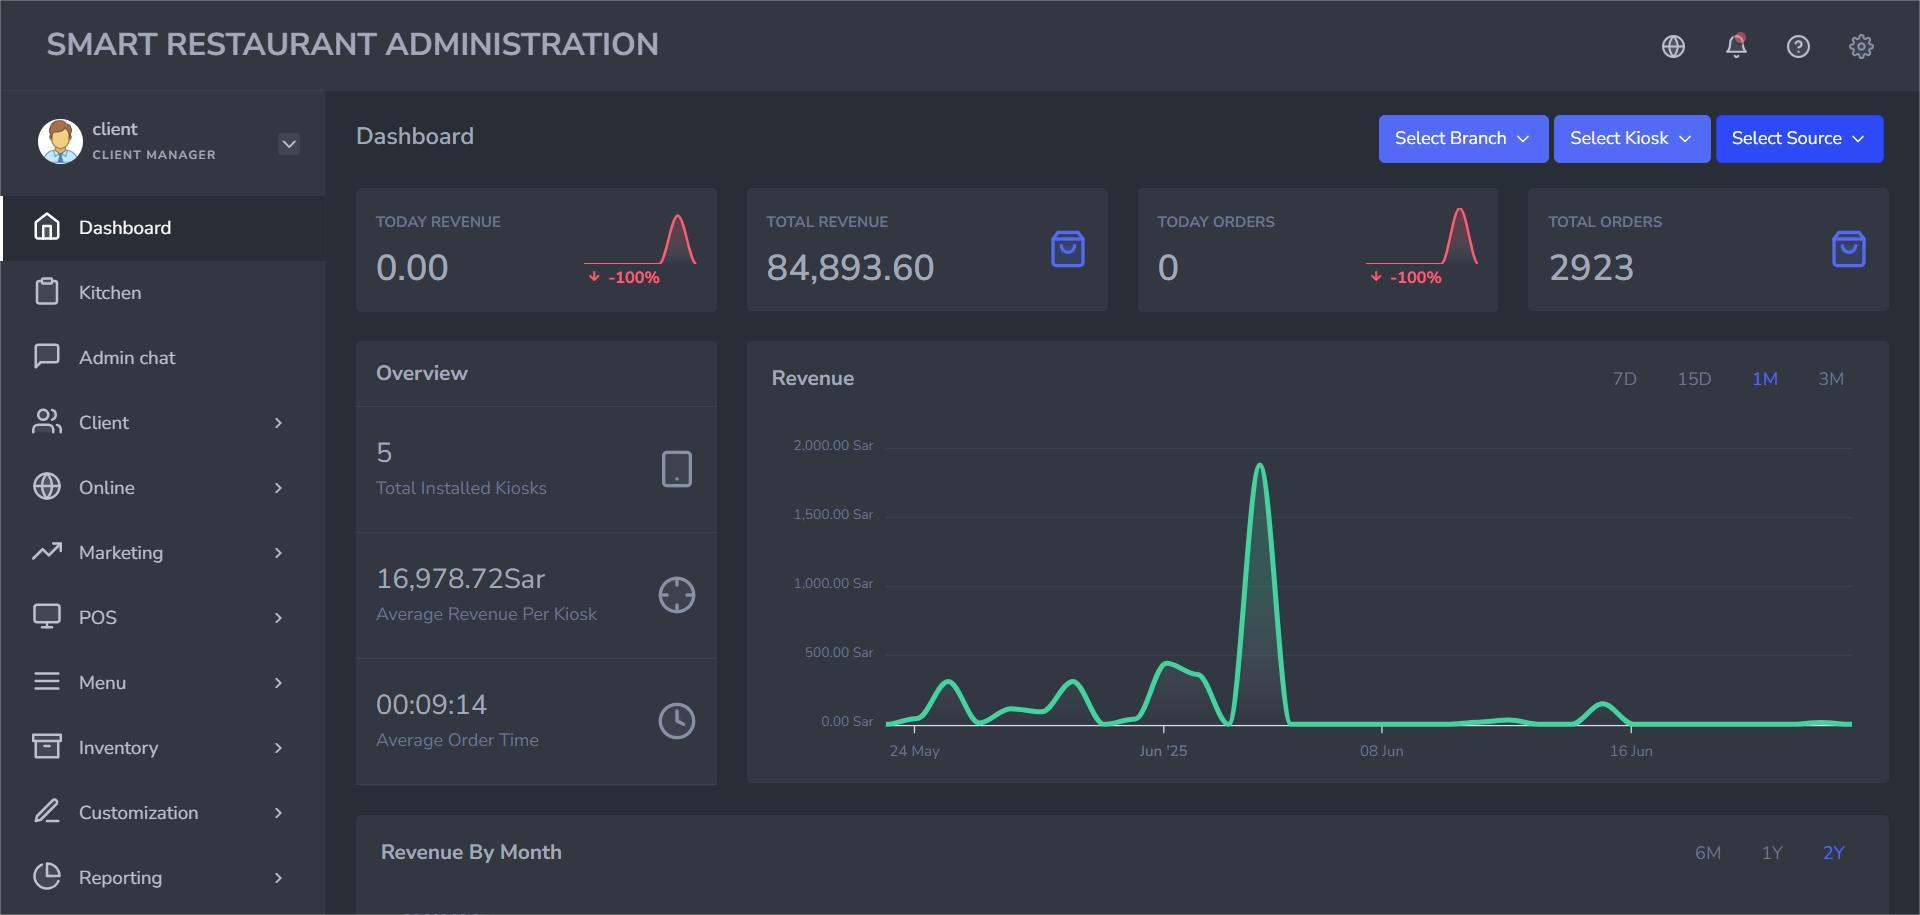
  • Profile (Dashboard Access): Upon successful login, you will be directed to the dashboard of the system seen below.
  • employee login to an existing shift

    On the left side of the page, you can see :

  • Your username and your role, which is «CLIENT MANAGER»
  • And many different sections to manage your cloud. The part illustrated above is called the «Dashboard», which we’ll talk about in the upcoming sections.

Login Out

Simply follow these quick steps to log out:

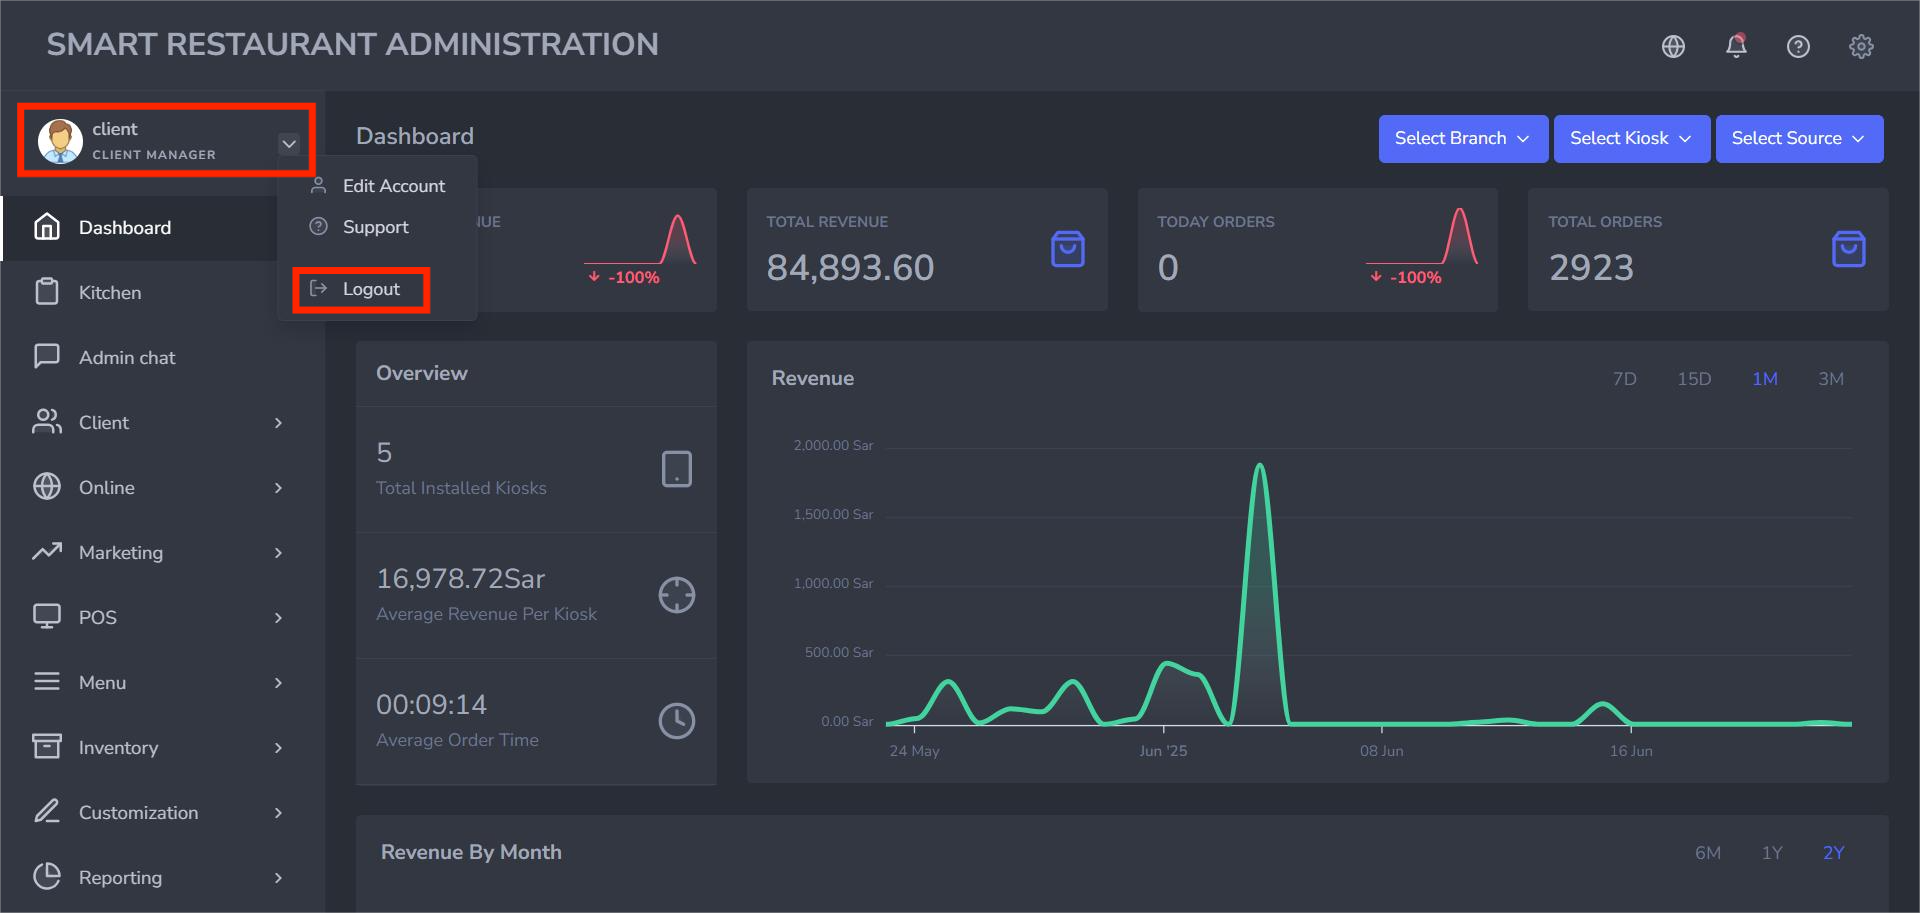
  • First, navigate to Profile: Your profile is located in the upper-left corner of the page, as indicated by the red underlining in the illustration image below.
  • Dropdown List: Next, click the small arrow next to your profile name (framed in red), and a dropdown list appears.
  • Click "Logout": From the dropdown options (Edit Account, Support, Logout), you can select "Logout."
  • employee login to an existing shift

Dashboard

On this page, you can:

  • Visualize all the data that allow you to understand the analytics that matter to your business.
  • Scroll down to see the whole pages, where you can track the exact revenues in every branch you have.
  • Select the specific branch you want to see on the blue upper button ‘select branch’.

  • revenu-by-branch

    my orders
    my order

Kitchen

Go to Kitchen App Site

Please follow this link to get a dedicated user manual for the kitchen application section.

kitchen

Client

Branches

In this section, we can observe all the branches and offices located elsewhere, apart from the main office where business is conducted. We can also find key parameters defining each branch's details:

  • #ID (Branch ID): A distinct identifier is assigned to each branch, facilitating identification.
  • Name: The official name of the branch.
  • Name (Arabic): The branch's name is presented in the Arabic language.
  • Client: The client who's associated with the branch.
  • City: The location of the branch, specifying the city where it is situated.
  • Ref: A reference, can be a code or unique identifier associated with the branch.
  • Automation: Indicates whether the branch is automated (automation enabled written in green) or operates manually (automation disabled, in red).
  • Tables: Details regarding the number or arrangement of tables within the branch. This feature can be either enabled (in green) or disabled (in red).
  • Status: Reflects whether the branch is currently enabled or disabled.
  • Actions: On the extreme right, a singular blue icon allows us to view all of the details of a specific branch.
  • employee login to an existing shift

Branch Details

In this section, we can view all the branch details mentioned before. In addition to those, we have the number of tables and the canceled orders from the kitchen status (either enabled or disabled), this feature allows us to know what are the orders that were canceled from the kitchen application.

employee login to an existing shift

Devices

The devices page is a dedicated section designed to manage and monitor the devices wither it’s a self-service kiosk unit, a tablet, or simply an online type of unit within the business. Within this page, the following parameters are essential for configuring and overseeing these units:

  • ID A unique identifier assigned to each kiosk for precise tracking and identification.
  • Name: The given name or label for the kiosk, for easy identification.
  • Ref: A specific reference or code associated with the kiosk, providing additional organizational context.
  • Model: The model (design) of the kiosk, indicating its specifications or version.
  • Branch: Specifies the branch or branches to which the kiosk is assigned, facilitating monitoring and control.
  • Type: Indicates the type of the unit, which could be categorized as KIOSK, Tablet, or ONLINE, providing insights into its form and functionality.
  • Status: Reflects the current operational status of the unit, whether it is active (enabled) or inactive (disabled).
  • Sleep Mode: Indicates if the kiosk is in sleep mode, when not actively in use.
  • employee login to an existing shift

Online

Drivers

Navigate the driver subsection to assess the performance of your delivery drivers. Track delivery times, efficiency, and customer satisfaction. This data is useful to enhance your delivery operations.

employee login to an existing shift

Online Orders

This functionality enables users to browse and place orders using an easy-to-use online platform. From selecting products to selecting safe payment methods, the process is simplified. Real-time updates and order tracking also ensure a seamless and enjoyable experience by improving transparency.

online-orders

B2B Orders

This subsection is mainly to help you understand the dynamics of your business-to-business transactions.

employee login to an existing shift

Customization

Products

These are the main items available for customization, such as sandwiches, coffee, and donuts. Each product is a distinct item that you can choose to customize according to your preferences and business needs.

menu-group

To add customization to a product first, click on “Add customization," and then fill in the information as illustrated in the image below:

add-menu-group

Product Option

Product options are specific configurations resulting from the combination of a product and its customizable options. This is where you may tailor a product to your liking by selecting from available options. For instance: you might choose a "Medium Roast Coffee" with the option of "Almond Milk" and "Single Shot."

Another client manager could customize an "Iced Latte" with the options of "Low Fat Milk," "No Added Sugar," and "Extra Ice."

add-option-customization

Sort Menu

The sort menu provides a structured way to navigate and find products. It could involve sorting products based on categories, options, or other criteria to enhance the customer's browsing experience. For example:

Products might be sorted by categories like "Hot Drinks," "Cold Drinks," and "Sandwiches." Within the "Sandwiches" category, customers could further sort by: products like "Bagel Cream Cheese Oats".

sort-menu

POS

Get full details on Cloud POS in its corresponding docs Page:

Cloud POS

Menu

This section is very important as it is responsible for monitoring and keeping an eye on all every product and item sold through the device. It consists of four subsections: Products, Categories, Options, and Family Option.

To add products to your menu, you need to first create a category following the steps in explained in the next section.

Categories

To add a category, first, click on ‘menu’ and then on ‘categories’, and the following window will appear empty.

employee login to an existing shift

Click on 'Add category,' and this window will pop up:

employee login to an existing shift

Follow these simple fill-in steps to add a category:

  • Name: Enter the category name you want for your product (soup, sandwich, drink...).
  • Description: You can add a description here, but it's optional.
  • Tags: This is how the software will identify your category when your client types it on the kiosk screen. Keep it simple and general (it can be the same as the name). Once chosen, click 'enter' to save it.
  • Once everything is set, add an image to your product, then click 'SUBMIT.'

Products

After finalizing the creation of a category (for example: Hot Drinks), we can now add the products that belong to this respective category.

Products are the various items and goods available for selection or purchase. Each product has distinct characteristics that you can customize using the option feature, For instance, if you're ordering a burger, the burger is the "Product,” and within this product, you can then select various options like the type of bread, the size, or any additional toppings.

employee login to an existing shift

To add a new product, click on “Add product,” and this window will pop up. Follow the fill-in process illustrated in the image below:

employee login to an existing shift
  • Name: Enter your desired product’s name.
  • Name (Arabic): Write the product's name in Arabic, if applicable.
  • Category: Select the appropriate category under which the product falls.
  • Price: Specify the price you want for your product.
  • Max Quantity: Define the maximum quantity of the product allowed per order, if applicable.
  • Status: Indicate the current status of the product, whether enabled (available) or disabled (not available).
  • Barcode: Assign a unique barcode to the product.
  • Ref: Include a reference number for internal tracking.
  • Action: Choose the action associated with the product (for example, search POS+ and enter SKU).
  • Tags: Add relevant tags for easy categorization and search. Make sure to press “Enter” on your keyboard for the tag to be correctly added.
  • Upselling: Specify if the product is part of an upselling strategy.
  • Display: Set the preferred display options for the product (enabled or disabled).
  • Available for a Limited Time: If applicable, indicate whether the product is available for a limited time.
  • Description: Provide a comprehensive description of the product if needed.
  • Image: Upload an image of the product for a clear visual representation.
  • Description (Arabic): Include the product description in Arabic, if applicable.
  • Once done, click n “SUBMIT” to save your new product!

Family Option

Similarly to the logic used in “Categories” and “Products”, this section refers to the overall set to which a specific option belongs. For example, "size" is the family option that includes different sizes like small, medium, large, and extra-large; it represents the broader set of choices within a particular product option.

We can break it down as follows:

  • Family Option: Cup size
  • Option: (e.g.,small S, medium M, large L, and extra large XL)
employee login to an existing shift

Click on ‘Add family option', and the following window appears:

employee login to an existing shift
  • Insert a desired name.
  • As for the type: you will have two options: one-select or Multi-select.
  • Choose according to the number of selections you want your client to have in this specific option.
  • employee login to an existing shift
  • Add a description optionally.
  • Add an image to illustrate your family option (optional)
  • Then click on submit.

Options

Options are the specific choices or variations you can select within a product; think of them as the detailed features or characteristics you pick when customizing an item or a product.

After adding a “family option,” you can now add your options, You need to first click on the third section in the menu, which is: «Options.

The following window will appear:

employee login to an existing shift

Follow these steps to add your desired options :

  • Click on ‘Add option’, and the following window appears:
  • employee login to an existing shift

    The filling process is similar to that for categories, except you will need to :

    • Add the price you want on the right.
    • And a Family Option if found.
    • Then click on Submit.
    • As explained earlier, the goal of this feature is to customize products using desired options. To add a product option:

    • First, scroll back to the “Products” section then, click on “Add product” as we previously mentioned. Once your new product has been added, you may add options to it by clicking on “Options” next to "Information.”
    • employee login to an existing shift
      employee login to an existing shift

    Menu Group

    Diving into the Menu Group, the last subsection within the extensive Menu section. This feature allows you to categorize your offerings based on specific criteria, enhancing the browsing experience for your customers.

    As shown in the illustration below, you can arrange your products under their respective categories, such as hot drinks, cold drinks, sandwiches, donuts, and more. Within categories, you can categorize items based on different section types shown as “Name” in the image, like kiosk, tablet, B2B, dine-in, or take-away. Based on their intended use or distribution channel, your products can be presented in a dynamic form with this multi-layered categorization system.

    menu-group

    Click on “Add Menu Group”, then add a name for your menu group, select the client, and make sure to enable the status as seen below:

    add-menu-group

    Marketing

    The marketing section of our system is mainly for your promotional activities to engage with your customers effectively. Within this section, you'll find several subsections to manage different aspects of your marketing strategy.

    Advertisements

    You can create a variety of ad formats in the advertisement section. To ensure maximum engagement, the advertisements can be customized to highlight a unique offer or promote a particular product. These ads can be tailored for either:

  • Full-screen ads are an ideal choice to promote special offers or present featured products because they capture viewers with eye-catching imagery.
  • Header or Footer Ad: Place ads at the top or bottom of the screen in a way that maximizes visibility while minimizing user experience disruption. Ideal for showcasing highlighted goods or advertising temporary promotions.
  • QR Menu: Provide a contactless browsing experience; this is particularly helpful when exhibiting a range of goods or services. Suitable for restaurants, cafés, or businesses that offer diverse products.
  • ads

    Follow these steps to add an Ad:

    add-an-ad

    Customers

    Within the Customers page, we have a set of parameters that provide comprehensive information about each customer:

    • #ID (Customer ID): A unique identifier assigned to each customer for easy reference and tracking purposes.
    • Name: The customer's full name.
    • Type: Specifies the type or category to which the customer belongs, either a company or an individual.
    • Phone: The contact number associated with the customer, facilitating communication.
    • Status: Indicates the current status of the customer, either enabled or disabled.
    • Action: This section includes three icons, each serving a distinct purpose. The first blue icon allows for viewing the customer's details. The second blue icon, represented by a pen, enables the editing of customer details at any given time.
    • The last icon, in red, serves to permanently delete a customer from the list.
    • customers

    Coupons

    They are the promotional codes that provide discounts or special offers for your products. You can create, manage, and apply them to specific products or orders. To do so, navigate to the Add Coupon button in blue and click on it:

    employee login to an existing shift

    Adding a coupon can be done by following the filling process in the following illustrated image:

    employee login to an existing shift

    After adding a new coupon, you can always view its details, update it, and/or delete it. Utilize the actions represented by the small icons (blue and red) on the extreme right:

    • Details: Get comprehensive information about your coupon.
    • Update: Modify existing coupon details.
    • Delete: Remove a coupon from the system.

    Groups

    The Groups subsection is aimed at organizing and promoting specific product sets and creating and managing product groups based on various criteria. To maximize group management efficiency, we can take multiple actions, such as view details, update, and delete any group at any given moment.

    employee login to an existing shift

    To “Add Group,” follow the illustrated filling process:

    employee login to an existing shift

    Offers

    The offers section is where you create and manage special discounts for your consumers. When you make an offer, you may tailor it to exactly what you want to accomplish in your marketing. This might include immediate discounts or special treats for your frequent consumers. Offers can be modified and updated at any time.

    employee login to an existing shift

    “Add Offer” for product. You can add different types of offers:

    • Amount: allows you to provide a fixed monetary discount; for instance, you might offer 5SAR off on a purchase.
    • Percentage: You can offer a percentage discount on the total price; for example, you could offer a 50% discount on selected items.
    • Final Price: This offer form allows you to set a final price for a product, regardless of its original cost. For example, if an espresso originally costs 10SAR, you can set a final price of 8SAR for a limited-time promotion.
    employee login to an existing shift

    Reporting

    Orders

    Provides a comprehensive overview of every order processed across all locations:

    • Order Summary: View total orders by type; dine-in, takeaway, delivery, online.
    • Time Filters: Analyze daily, weekly, monthly, or custom date ranges.
    • Status Tracking: Monitor orders by status (completed, pending, canceled, voided).
    • Detailed View: Click into each order to see items ordered, quantities, modifiers, total amounts, customer info, and timestamps.
    • report-orders

    Inventory Sales

    Allows tracking of stock consumption directly linked to sales:

  • Product Usage Tracking: Shows how much ingredient or item was consumed based on completed orders.
  • Time-Based Analysis: Display consumption data over daily, weekly, or monthly intervals.
  • Low-Stock Alerts: Automatically flag items with consumption nearing reorder threshold.
  • CSV Export: Download data for inventory reconciliation or audit purposes.
  • inventory-sales

    Charts

    The Charts section provides an interactive data visualization suite that helps managers and decision-makers quickly analyze performance metrics through visual graphs. It’s designed to offer an intuitive and insightful view of operations across products, sales trends, and other KPIs.

    This feature supports three major types of charts, each tailored to different analysis needs:

    • Pie Chart (Circle): Great for showing proportions and category distribution (e.g., product sales contribution).
    • Line Chart: Ideal for viewing trends over time, such as sales growth or traffic patterns.
    • Bar Chart: Perfect for comparing sales volumes, products, or branches over a selected period.
    charts overview

    How to Generate a Chart

    To create a chart, follow these steps. Let's take the example of generating the Revenue By Products chart:

    1. First, choose the desired date range. For example: 2025-01-01 00:00 to 2025-02-02 23:59.
    2. Next, click on the specific chart you want to generate — in this case, Revenue By Products.
    3. Finally, click on the green Generate button to render the chart based on the selected criteria.
    chart generation example

    This tool allows restaurant managers to track performance and make informed decisions based on real-time data. It is especially useful for spotting high-performing items, identifying low-performing categories, and optimizing the menu and pricing strategies accordingly.